Showing posts with label costuming. Show all posts

Sunday, July 20, 2014

Butterfly Hair Accessories


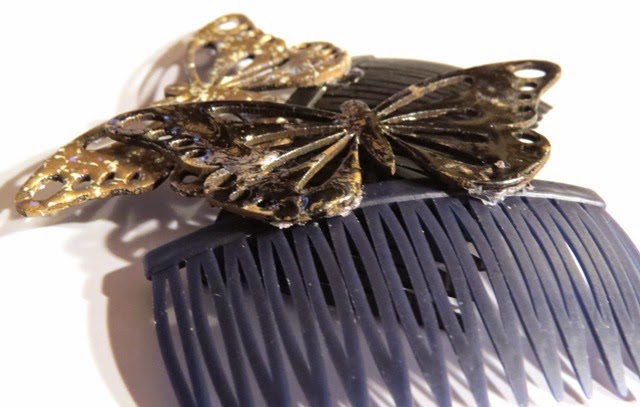
Happy Monday everyone! Today on the Globecraft & Piccolo Blog I share a great hair accessory craft. Recently I needed some vintage looking comb pieces to put in my hair and thought the Butterfly Piccolo Accents would be perfect! I was right!
 I began by applying Enamel Powder Adhesive to the butterfly chipboard and heat embossed Mermaid Tears EP to three, and Vintage Black EP to three more. All butterflies had two or more layers of heat set embossing powder. The backs of the butterflies were finished with black paint.


 The embossed butterflies were then adhered to plastic combs using E6000. They were held in place until dry.


  I hope you enjoyed my project! Thank you for stopping by today!

Twitter at @leslierahye | Facebook at leslierahye.| YouTube at leslierahye | Pinterest at leslierahye

Thursday, October 27, 2011

Heroes come in all sizes

As I've stated earlier this is Red Ribbon Week in the states and our school district celebrates with silly dress up days to help get the kids motivated about the Drug Free campaign. Today's theme for the intermediate school was Super Heroes.
I asked my son last week, in preparation for the individual days and he said he really wasn't sure. I began looking around the house for options...a mask, a cape, shiny shorts...such as that. So on Monday, I ask him again, and this is the response I get : the dragon warrior. [Now those of you not in the know are asking yourselves...the dragon warrior? Well who is that? Some of you may even come up with Dragon--as in Bruce Lee. The Dragon Warrior is none other than Po-THE big fat panda!]
I did not bat an eyelash. I have lived with this child for 11½ years. This is the child that desired to be a helicopter, a Renaissance man, a dinosaur, and a hot rod tractor for consecutive Halloweens. Having been on board with all of the aforementioned disguises, I could be on board with this one. After all I am a woman with a green clown wig and a clown makeup chest in my closet.
I asked him WHY The Dragon Warrior. He said, "He save all of China from Tai Lung." I smiled and nodded. He continued that he could be either that or a janitor--and every day hero. Did I mention I love this kid? So I look around for things that could help us be The Dragon Warrior--this is what we had to work with:
Within reason we had to keep to school code: shoes, no change of hair color, stuff like that. So to create a homemade Po costume for yourself you will need:
Black T-shirt or sweatshirt
Black pants or sweat pants
White undershirt that you can cut up
White Duck Brand Tape
small piece of black material [felt or fleece]
head band
larger Khaki shorts
Red belt [rope and red material]
material strips for the rags at Po's feet
face paint
pillow

I cut the white undershirt just below the armpits. The pillow was taped to the black shirt so that it rested just under his underarms. It was taped at the top and in the middle. The white undershirt was placed over the pillow and taped into place. The tails of the shirts and the pillow were tucked into the over-sized shorts and a simple belt from rope wrapped in red fabric was fashioned and strung through the loops. Rags were wrapped at his feet to simulate those on Po's. Ears were constructed by gluing black felt together with Duck Tape as a base to stiffen them. They were hot-glued to a headband. [Will's ears are in a relaxed Panda position, not the agitated panda position indicated in the photo below.] We painted his face to look Po-ish. 
I tried to get him to pose in the above kung-fu stance but Will said no. He would however do the skadoosh pose for you all. He is very pleased with his super hero costume and that makes me a happy mom. 
Thank you for stopping by! I hope you enjoyed our super hero idea.

Wednesday, October 26, 2011

Rock Star Accessories!

UPDATED: These projects are currently in a blog link-up contest with Fave Crafts. Please go vote for my projects here. I would really appreciate the support. I could win a $50 gift card that would help me continue to share with you fun crafts!
This week is Red Ribbon Week at my children's school. If you are unfamiliar with Red Ribbon Week, you can read more about its history and presence in the school systems across America here. This year the kids in addition to wearing Wednesday's traditional RED, get to wear pajamas, come as their favorite super here [a special post to come on this too], come dressed in their favorite team jersey, and for my daughter's school, come to school as a ROCK STAR! 
My little Rock Star did not wish to have her photo made in her Rocker Attire so you simply get the photos of the items I crafted to go with her flashy jeans--they have stars stitched into them as well as a few appliques of stars on them-- and rock star shirt. 
Upcycled 3D Movie Glasses with bling and Pink punchies
Pinked up Homecoming Bow with added mulberry flowers

Upcycled water bottle bracelets with ribbon and eyelash/pom fibers 
 Thank you for stopping by! I hope you enjoyed my projects!

Friday, September 30, 2011

Career Day Costume | Officer Sam!

My daughter is in Kindergarten and this week they have been studying Community Helpers and Careers. Today was the day they had all been waiting for : Dress Up Career Day!! Sam came home a few weeks ago in preparation for this day to announce that she needed to be a "policeman" for career day. She then proceeded to tell me about her PINK policeman costume. I informed her that police officers didn't normally have pink in their uniforms and that we would see what we could do.
Items needed for Career Day Costume
navy pants/leggings and navy t-shirt
navy visor and matching fabric
roll of Pink Duck Brand Tape
cardboard or card stock
foil
brads
glue, need, thread
police person accessories

To transform Sam's navy outfit into a police uniform, I simply printed off the word "Police" in an easy to trim font on my computer [Impact] and put some Duck Tape on a used sticker sheet. I cut around each letter and then lined them up on a ruler to make the word straight. I replaced the dot on the "i" with a ♥.  The Duck Tape is removable and Sam can wear the shirt long after Career Day.

For the hat, I cut an 8" circle out of the card stock [2 layers glued together for strength]. I glued the card stock to the fabric and cut another circle out of the fabric--about 13". I gathered the fabric on the edge with needle and thread and a quick running stitch. The gathered circle was then hotglued and stitched onto the visor...the front the circle goes OVER the the lip of the visor. Once past the brim, the circle edge gets tucked into the visor. A piece of Duck Tape folded into 3rds was used to fashion a trim across the front of the hat. 
A simple badge shape was cut out of the double card stock. Cardboard letters "PD" were adhered to the front. Foil was then rubbed on and around the badge to make it "shiny". The badge was applied to the hat with glue.


The belt was constructed using 4 long pieces of Duck Tape. Loops were fashioned out of Duck Tape folded into 3rds and taped in the back. A "buckle" was made using a buckle alphabet letter that I had but could easily have been made using a piece of card board covered with tape or foil. "Fabric" was made by laying strips of tape upon themselves until  a big enough piece was achieved. I then made a pocket for the handcuffs and a cover for the ticket book. Brads were used as decorative elements on the belt and hat.

Officer Sam LOVES her pink police officer uniform and will be roaming the halls handing out tickets to those not following school rules! Thank you for stopping by! 


Saturday, June 25, 2011

Gill's Fairy Day Blog Hop Day 2 | Fairy Party Wings

Good Morning and welcome to Gill's Fairy Day Blog hop Day 2. This is a 2 day hop for 24th and 25th of June where the line up on both days is different--I am participating on both days so come back for more tomorrow! If you wish to see my project from Day 1, return to posts from yesterday here.
If you arrived here from Vickie's blog then you are in the right spot! If you joined in randomly, you may start at the top of the hop here!
The theme of this hop is FAIRY Day so what we are doing on this hop is bringing together a select few people from all over the world to take part and for them to create a project with a fairy or fairies on it.
This is a differnt kind of hop as along the hop there are letters to find in the postings - not all blogs have the letters but if you gather all the letters then at the end of the hop on day 2 assemble them to create a fairy related word. If you then return to my blog and enter the Mr Linky at the bottom of the post (do not reveal the secret word yet). After the hop i will contact someone at random and ask them to email me with the word - if correct they win some lovely candy from Gill.
For my post today, I wanted to share ideas and a project that was made for my daughter's 3rd birthday--The Fairy Party!! The back yard was transformed into Fairyland for the birthday party--luckily we have wild spiderwort that grows in the back yard and makes a beautiful Fairyland backdrop. As we have never witness a true fairy circle at our own house, we created one with mushrooms bought at the stores and toothpicks to stick them into the ground. Fairy puppets constructed of wooden puppets with felt, yarn and pipecleaner wings were througout the yard near fairy areas. The cake was a two layer round strawber iced with buttercream. The birthday girl wanted fresh flowers on the cake for the deoration and hotpink icing with kelly green trim. Guests were transformed upon arrival into fairies with painted faces and transparent wings.
To construct the wings you need 4 transparency sheets, alchohol inks, paint, tissue paper and gel medium or modpodge, felt, hotglue, 2 yards of ribbon cut in half, stapler and glitter. Trace a butterfly wing pattern onto the transparency with a marker. Working on the opposite side of the traced line, begin with alchohol inks, layering and blending until the desired patterning and spotting is achieved. Each of these can be VERY different from set to set. The older kids enjoy making them as well.
Next layer on paint and or tissue paper--work so the wings still have some transparency. Feel free to work over the drawn line as the line will be for cutting and you want your layers to be all the way to the cut line.
When the wings are dry, add squiggles or brushstrokes of white glue and sprinkle with glitter! This can be on either side.

To assemble the wings, pleat the flat edge of the wing and hold in place by stapling the edge of the pleat. do this for EACH quadrant of wing. Place the wing pairs--bottoms together and then tops together-- and secure with a few staples i the pleated parts. With clear hot glue, run a bead of glue down the edge of the wing that is not pleated and attach to the top quadrant--repeat for other side. With hotglue attach the ribbons to the wings first leaving tails for tying. In the final step, glue a strip of felt around the stapled wings and ribbons to secure in place and disguise the assembly of the wings. Fairies wings are attached by tying a bow with the ribbons around the arms.

Above are examples of fairy houses found around fairyland. The rooms in the cinderblock were several toghether to form an appartment complex for the fairies. Another house was a side-turned clay pot and the final house was constructed out of sticks in the shape of a teepee. Acryllic sheeps wool made a native fairy looking habitat. Since fairies collect treasure around the home and take their people's things, the homes were furnished with items made by the fairies or altered from people items...thimbles, footstools, tiny chairs. Beads, keys, jewelry and glitter of course were all fair game for the fairy. One brave little winged creature even swiped a phone!
We had a great deal of fun transforming the kids and the yard into Fairyland. This article is one in a line of articles that I write for event/birthday party planning. There is one more article to be written about other decorations in the yard and fairy crafts that the participants created while attending the party. That article will be coming in the next month or two.
I really appreciate you stopping by! I would appreciate it if you would leave a comment or follow me if you enjoyed what you see!
Now back to the hop -Gill has hidden a number of letters throughtout the hop over both days. I personally do not have a letter on my stop but there are some hidden nearby! Remember to collect all the letters from the hop (they will appear over the 2 days) and assemble to form a fairy related word then return to Gill's blog at the end of the 2 day hop and enter the Mr linky (not revealing the word) for your chance to win candy.
The next stop on the hop is my crafty friend  Haidee! Hop on over to see her wonderful creations!