Sunday, July 28, 2013

Hot Time in the Summer Challenge at Cheery Lynn Blog

Happy Sunday everyone! I've had a crazy busy summer and am just now getting around to some fun tools that I've recently added to my collection that I found at the Scrapbook Convention this June. For months I've been watching several of my scrappy friends using these incredible super-thin dies from a company called Cheery Lynn Designs. I knew the convention would probably have them and I was THRILLED to find them!! The selection of dies is amazing, the price point perfect and the detail and design is awesome! 
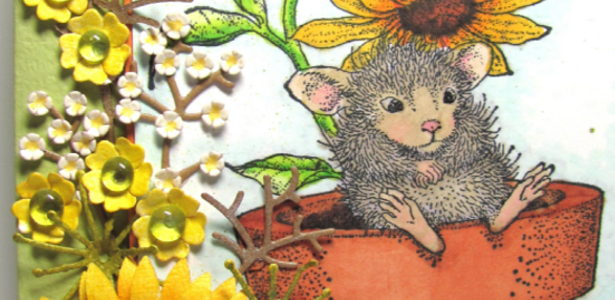
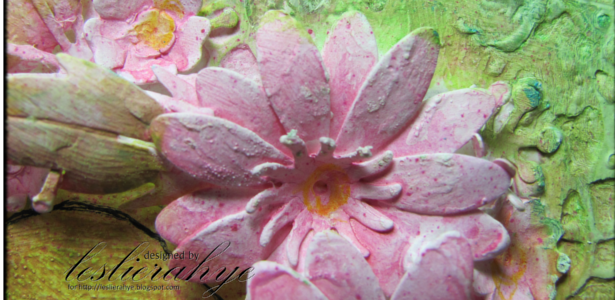
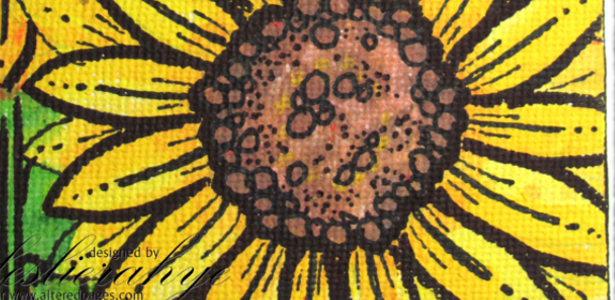
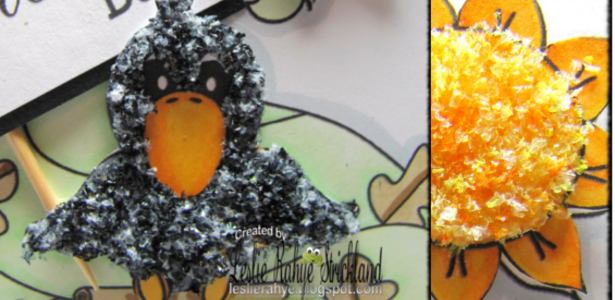
I am a big fan of flowers as you already know and Cheery Lynn has a how line of "Build a Flower" dies that make creating your own flowers super easy.  I used the Sunflower die and the Embellishments 3 die to create all the flower on my card below. I die cut all the flowers out as above in a cream and dark tan color of card stock. I then colored with markers and misted with sprays to achieve the colors on the flowers. I used my McGill stylus set to create dimension on the petals. Little Amanda, "The Thinker" seems to be getting some shade from the sunflower in the pot for the "Hot Time in the Summer" and Sunflowers definitely say "Hot Time" to us here in Texas!
I hope you enjoy my card!  Below is a link and rules in case you want to play along!

Supplies Used
Memento Tuxedo Black
House Mouse Amanda as "The Thinker"
Spectrum Noir [PP2, OR1, GB3, TN3, TN5, EB2, GB4, CG4, CG3, BT1, GG1, CG2, EB1, EB8, BG2]
Maya Road Mist Pearl
Clearsnap Smooch Spritz Sun Kissed & Limolicious
Bazzill Basics
Neena Card Stock
Artist Glitter Glue
Sakura Crystal Lacquer
Scrapbook Adhesives Mystix runner
Foam Tape
Robin's Nest Dew Drops 


Shop Cheery Lynn Designs
This week the challenge at Cheery Lynn Designs is
Hot Time In The Summer
Here are the rules:
  • You MUST follow the theme and use at least one Cheery Lynn Designs die, of course, we would love to see more than one. 
  • You MUST add a link to your blog post in the InLinkz at the end of this post; no back posting, only new projects are allowed
  • You MUST link to this challenge in your blog post or on your gallery post
  • You may only enter the challenge ONCE per week.
The winner will be chosen based on merit by Cheery Lynn Designs. They will receive $20 towards shopping at the Cheery Lynn website. The challenge will end on Saturday night at 18:00 Eastern time.

Wednesday, July 24, 2013

Weekly Challenge | Make a Wish

It's time for a new release and a new challenge with Digital Delights by Louby Loo! This week at Delightful Challenges our challenge is Make a Wish : add stars or candles. Felicia Fairy is perfect for a "Make a Wish" card. I love the sentiment Believe in the Magic--the magic of a wish. I used supplies from the sponsor company Robin's Nest...these papers are among my favorites of this company and I love how the diamond shape Dew Drops make a great star for her wand! I hope you enjoy my card! Thank you for looking!

Digital Delights Stamps :Felicia Fairy
Card stock : Robin's Nest Denim Cardstock and Fleur Admiral paper, and Neenah 
Markers : Spectrum Noir [FS1, TN1, HB1, BT2, TB1, CR3, PP1, FS2, IB1, GB4, TB3, GB2, TB2, TN2]
Accessories :  Scrapbook Adhesives MyStik, Crystal Lacquer, Robin's Nest DewDrops [diamond shape] 

This weeks theme :
Make a Wish:
 include candles or stars on your project
Challenge Rules below

One of our favorite sponsors is back this week
Prize:  $15 gift certificate
\It
Now it's Your Turn!
You are not required to use a Digital Delights 
Image to join in the fun 
but if you do, you can enter TWICE.
To enter twice when using a Digital Delight image,
for your 1st entry use your card link.
For your 2nd entry use your blog address
 and add "2nd entry" after your name
**Please be sure to follow the challenge theme and rules or it will be removed.

Tuesday, July 23, 2013

Upright Z-Fold Card with Digital Delights


Happy Tuesday Tutorial! I'm sharing a twist on a card folding favorite of mine over on the Digital Delights blog today. It's called the Upright Z-Fold Card.
I hope you enjoy my tutorial! Thank you for looking~


For this project

Molly Moose

Holly Tag set

Totally Tartan Digital Paper pack

Check out the how-to video on our Tutorial Blog or here

Friday, July 19, 2013

Test Driving the Faber-Castell Floral Gallery kit at Altered Pages

Happy Friday everyone~! I wanted to share with you the fun I've been having with the five little pencils in the Faber-Castell Floral Gallery Kit that I got through AlteredPages.com. This is a great kit to introduce you to watercolor pencils and watercoloring on canvas. It comes with a terrific instruction booklet that goes through various techniques that you can use with these pencils. It includes 4 pre-drawn boards for you to color and also a "practice" palette board to experiment with the colors. 

Following the directions in the book on getting a range of colors from the five pencils, I proceed to test drive the colors in a traditional manner. I colored lightly and with more vigor onto the rectangles of the canvas and then applied water to my brush [included in the kit] and activated the pigment that I had laid onto the canvas. [first two rows above]. Then I proceeded to see what colors I could create with the 5 pencils I had. I was impressed at the range of colors with just adding equal parts of color--of course there are millions depending the percentage of each color that you add to the mix.


In the instruction booklet, it was also suggested that you could use a piece of paper as a palette to mix the colors and then apply THAT to the canvas...in the bottom  3 rows of the canvas board in the previous photo is what the paper pallet colors looked like...they have a super pastel feeling quality to them. Again, it was easy to get a terrific range of color with this technique. My only recommendation here is to be generous with the water. On paper your color easily soaks into the paper once activated with water--you need more water to have paint to apply to the canvas!

After my "test drive" I decided to work on one of the canvases that looked similar to a sunflower. Since I had used my pencils considerably playing and checking out the colors, I needed to sharpen them--there is a wonderful little sharpener included in your kit. Of course I did not want to waste the shavings that were made and so I dumped them gently into a little paint pallet and used them to mix and create the sunflower canvas. 

Working from the background to the foreground I first layered washes and then more concentrated colors to bring out the details of the flowers. Many stop with just the application of color onto these little canvases but I find I like a little doodling with my watercolor. 

I pulled out a variety of sizes of Sharpie Markers and proceeded to tangle my favorite flowers over the watercolor. I LOVE the effect. The Sharpies worked beautifully over the Faber-Castell Aquarelle watercolors and canvas. The kit comes with 2 flowers that look sunflower like and 2 that look Tiger Lily like. My plan is to gesso the tiger lily boards and make more sunflowers so that I have 4 happy sunflower panels! 
Thank you for looking! I hope you try this super kit...experiment to see all the colors that you can get with 5 little pencils! Hop on over to AlteredPages.com to pick yours up!

Wednesday, July 17, 2013

Weekly Challenge | Celebrate with Glitter Bling and Sparkly things

It's time for a new release and a new challenge with Digital Delights by Louby Loo! This week at Delightful Challenges our challenge is Celebrate with Glitter, Bling and Sparkly Things. For this card I brought back out the Sparkly and Magic Digital Paper Pack as it was perfect for my Festive Flamingo to skate with and add visual sparkle to the card. Actual sparkle was added with a variety of glitters and some DMC Gold Spool Thread --used for the light cord. This month I'm celebrating Holidays in July and my tall Believe in the Magic Card is the perfect addition to my celebration! I hope you enjoy my card! Thank you for looking!

Card stock : Bazzill Basics and Neenah 
Markers : Spectrum Noir [PP1, PP2, PP4, PP5. OR1, GB5, DR2, IB1, IB2, IB3, BG6, BG10, BT9, IG4]
Accessories :  Scrapbook Adhesives MyStik, Art Glitter Designer Dries Clear, Prisma Glitter and chunk glitter, gold thread

Melissa ~Stamp It
This weeks theme :
Celebrate with Glitter Bling and Sparkly things
Challenge Rules below

We have a new sponsor this week.  Delightful Challenges welcomes

http://thecuttingcafe.typepad.com/
Prize - 3 sets from store
\It
Now it's Your Turn!
You are not required to use a Digital Delights 
Image to join in the fun 
but if you do, you can enter TWICE.
To enter twice when using a Digital Delight image,
for your 1st entry use your card link.
For your 2nd entry use your blog address
 and add "2nd entry" after your name
**Please be sure to follow the challenge theme and rules or it will be removed.

Thursday, July 11, 2013

Removing a Pest from my Bloom

Early this year I began a venture of creating a product line with a company that from outward appearances was everything I wanted: family-owned, American-made and quality product. I created designs, produced production-ready files and publicly promoted their company and forged relationships for them with other companies I know and work with closely. 
After months of conversations and work, I finally see an end-product and start getting really excited about my new chipboard product line being sold in major online stores. In the course of 6 hours, through a series of online exchanges, lies were uncovered. While I was willing to discuss to reach some sort of compromise where all parties could benefit, I was met with a barrage of back-peddling emails where everything "promised" was not only retracted but also "all previous conversations" were no longer valid. The conversation I was attempting to have in no way rated the reaction that I received.
Those of you who know me know I put a great deal of emphasis on integrity, honesty, and honor. If you are not true to your word then you are a liar, plain and simple. I cannot be a part of that. 
What this means for you my loyal followers is that I no longer have affiliations with these people. They have not paid me for my designs. They are not theirs to sell. I have written a letter calling for them to cease production and sale of my product line.
I will not be lied to or bullied into something because someone has decided to retract everything they said--in essence the entire agreement. I am disappointed by this turn of events--I will not lie--BUT I have the desire to move forward and not to let this pest ruin my bloom. I know by the reaction of the online entities who wanted to purchase my product for their store that my designs are good and valued. I will find another way, an honorable way, to see my dreams realized., This is merely a pesky bug and will in no way effect my ability to thrive and bloom. Thank you for your time! Now let's move forward. Blooming.

Wednesday, July 10, 2013

Weekly Challenge | In the Fringe

It's time for a new release and a new challenge with Digital Delights by Louby Loo! This week at Delightful Challenges our challenge is Into the Fringe--fabric or paper fringe. I used this super sweet Crafty Mouse Coordinating Set and created a scene for Crafty Mouse with my GIMP free GNU Image Manipulation Program. It's hard to see in the image but the fabric is frayed a little creating a "fringe." I hope you enjoy my card! Thank you for looking!

Digital Delights Stamps : Crafty Mouse Coordinating Set
Card stock : Bazzill Basics
Markers : Spectrum Noir
Accessories :  Beacon 3in1, buttons, fabric, punches, 3DGlueDots

This weeks theme :
On The Fringe
(include fringe - either paper or fabric)
Challenge Rules below

We have a new sponsor this week.  Delightful Challenges welcomes

ap It hare It
Now it's Your Turn!
You are not required to use a Digital Delights 
Image to join in the fun 
but if you do, you can enter TWICE.
To enter twice when using a Digital Delight image,
for your 1st entry use your card link.
For your 2nd entry use your blog address
 and add "2nd entry" after your name
**Please be sure to follow the challenge theme and rules or it will be removed.

Tuesday, July 9, 2013

Tuesday Tutorial | Create a banner with Digital Delights by Louby Loo

Happy Tuesday Tutorial! Leslie-Rahye here to share a fun Festive Bunting Tutorial. I created this bunting using the Bunting Banner Set, the Rainbow Digital Paper Pack and the Festive Flamingo! Creating a bunting decoration for your party and holiday  is super easy with these digis from Digital Delights by Louby Loo.
I hope you enjoy my tutorial! Thank you for looking~


For this project
Festive Flamingo
Festive Flamingo
Bunting set
Bunting set
Rainbow Digital Paper Pack
Check out the how-to video on our Tutorial Blog or here


Thursday, July 4, 2013

Exciting News!!!

I have some fantastic news to share with you...I will be releasing a product line with the fabulous LeakyShed Studio very very soon!!! We have been working on this since January and I've been dying to share it with you! At last I can share a quick sneak peek.... EEEK!!! Are you ready!?!?!

Stay tuned for more peeks...
Leaky Shed Studio Logo
I love this company because not only are their products made in the USA, but they are family owned and operated. Bill and Wendy are great to work with  and I'm excited to be bringing you my designs with their company!! Be sure to like them on Facebook!

Wednesday, July 3, 2013

Weekly Challenge & New Release | Into the Wild!

It's time for a new release and a new challenge with Digital Delights by Louby Loo! This week at Delightful Challenges our challenge is Into the Wild! The new release is perfect for this challenge with the darling "jubbly" critters. If you're like me you're asking yourself "What is Jubbly?" Well I asked Wendy...she said it comes from a saying "Lovely Chubbly" and it that it kind of means "fun and cute." That is it EXACTLY. I have admitted that from time to time I squeal aloud when I see the new release. This most definitely one of those times [next month is too but I'm sworn to secrecy]. She made me a Jubbly DRAGON!!! HOW STINKIN' CUTE IS HE?!?!? I'm in love. Getting ready for this challenge I colored him several times...different color schemes...You WILL see him again as I love him! Thanks Wendy!! I hope you enjoy my card! Thank you for looking!

Digital Delights Stamps : Jubbly dragon
Markers : Spectrum Noir
Accessories :  Beacon 3in1

We have a great new release and a new challenge for you this week.
This weeks theme :
Into the Wild
(include a critter!)
Challenge Rules below

We have a wonderful Sponsor this week

http://www.scrapyland.com/

Your Prize!!!
$15 store gift card

Now it's Your Turn!
You are not required to use a Digital Delights 
Image to join in the fun 
but if you do, you can enter TWICE.
To enter twice when using a Digital Delight image,
for your 1st entry use your card link.
For your 2nd entry use your blog address
 and add "2nd entry" after your name
**Please be sure to follow the challenge theme and rules or it will be removed.

Monday, July 1, 2013

leslierahye's Scorchin' Hot Summer Steampunk Celebration Blog Hop!

Welcome to my Scorchin' Hot Summer Steampunk Celebration Blog Hop! As the temperatures rise and summer gets into full swing, I have gathered several of my artsy and crafty blogger friends and we are trying to keep it cool~ Steampunk Style!  I hope you enjoy our projects~

Today I altered a bottle to a red-silver-blue steampunk accessory for my summer celebrations! This is my new passion...I love upcycling and altering...this next step just made sense after observing some beautiful and unique creations from artist Andy Skinner. This is my own spin on altering bottles. I hope you enjoy it!
I covered my bottle with kraft paper bag with Beacon Fast Finish Decoupage. I then painted a base coat of red paint and layered on blue and silver. Next I attached my metal pieces with E6000. A coat of blue paint masked the fact that the pieces of metal were varied. I then dry-brushed on the silver and accented with dots. The plastic string of stars [a Dollar store find] were painted blue to match and attached with E6000--along with their cogs. Sari silk was attached to the top with Beacon. This will be the perfect accessory to my Summer Celebrations tablescape! Thank you for looking!

Continue the Scorchin' Hot Summer Steampunk Celebration by hopping along to each of my talented friends! Be sure to leave some love for each of them!