Showing posts with label Ranger. Show all posts

Thursday, September 17, 2015

September Monthly Smeared Ink Member Blog Hop | STEAMPUNK!

Good Morning Smeared and Smudged Family! This month I'm participating in the Steampunk Members Blog Hop! I LOVE steampunk and actually host 4 or 5 blog hops a year dedicated to celebrating holidays steampunk style! I needed this hop to rewind my mind and gear up for new creative adventures coming my way. 


For today's tag, I started with a piece of patterned paper that I stamped across to create "background clutter". I die cut some gear shapes and inside some of them you see stamping as well. I layered my gears, added some bling and some pearls. I created some shadowy depth with sepia pastel around gears. I added some doodle lines with my PITT pen and added some steampunk washi tape and more pearls to the topper to finish off the tag!

Thank you for stopping by! I hope you enjoyed my project!
Be sure to hop to the rest of the Blog Hop Smeared Ink Family!

Leigh | Rebecca   Lyneen | Fiona | Elenor


Twitter at @leslierahye | Facebook at leslierahye.| YouTube at leslierahye | Pinterest at leslierahye

Friday, July 3, 2015

Thursday, June 25, 2015

Steampunk Cards with Rebecca Baer™

This post can now be read here.

Thursday, June 18, 2015

Delightful Thursday

It's Delightful Thursday and the Digital Delights design team is sharing inspiration on the Digital Delights Blog today! 

GOOD Morning! Today's card from Digital Delights I created this fun gate-fold scene with precolored images from Digital Delights. I love Ready for Battle Sparky and Cowardly George! They are so cute. I brushed on sparkly perfect pearl mists on the armor and castle. On the castle background and the gates I brushed on watered down dylusions mists to create a wash for the sky and grass. I scored a thin strip on the side to fold neatly and adhered it to the edges of my card so that each side opens. Little notes can be written on the reverse side of Sparky and George! The whole scene was matted on some blue and then onto a heavy base card square. I hope you enjoy my project!
Castle
Ready for battle Sparky
Paper: Bazzill
Accessories: Foam Tape, dylusions mists, perfect pearls mists

Thank you for stopping by!
Be sure to check out the rest of the team !


Twitter at @leslierahye | Facebook at leslierahye.| YouTube at leslierahye | Pinterest at leslierahye

Thursday, June 11, 2015

Prejudice is a burden art journal page with Rebecca Baer®

Good Morning! Today I've created a journal page using Rebecca Baer™ Stencils and brushes. Rebecca's small stencils are perfect for art journaling and her brushes are a dream to work with.


For this project I began by laying down a thin coat of gesso on my mixed media paper so that my inks and colors rest on top of the surface rather than absorbing down into the paper. This way use less product to achieve the deep colors I love.  Using a wide brush in the RB Classique™ Angles set, I brushed thinly and quickly but completely to get a full coverage.
RB Classique(TM) Angles - Product Image

Next I applied watercolor crayons to the surface with no particular pattern in mind. You will see below that once water is applied and the colors are all blended it looks NOTHING like the pattern. I used the RB Classique™ Angles brush to get a smooth blend of the colors.


Next I grabbed my Mixed Elements Honey Comb Small Stencil [I just can't get enough of this stencil]  and began layering mists on the background I had created. For this technique I applied a LOT of mist in some areas and dried it with my heat tool to create those darker pools of ink.
Honeycomb Stencil - Product Image


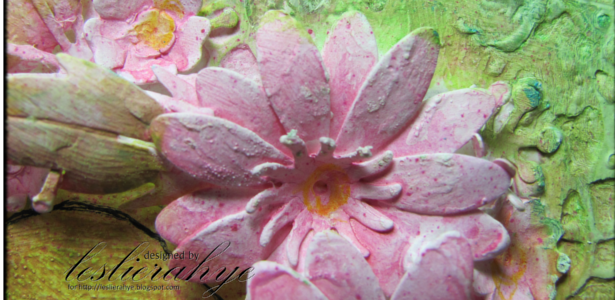
For this journal page I will share a quote and only need a single element to the side that enhanced my page. I love this Blooming Daisy Stencil| ST-502 in the medium size for this project. It's almost the full size of the page and it complements well with the whole natural feel of the Mixed Elements Honey Comb stencil that I've used. Using gesso I painted several layers through the solid part of the stencil to provide a lighter area to paint over the sunflower so that it will pop rather just blend in. There is so much ink on this page that the wet of the gesso mixes with and activates the mist below making the gesso appear blue green! 

Blooming Daisy Stencil | ST-502 - Product Image

Next I layer on acrylic paint to color the daisy to look like a sunflower using the small brushes in the RB Classique™ Angles set

Using the tip of the brush I added little "seeds" to my center.

Using the detail portion of the Blooming Daisy Stencil I misted a copper sparkly color, blotted it and then went back with a white mist...you can just see a hint of the details. I printed off my quote, misted it lightly with the colors I had used, cut it apart and adhered it to the page. 

Finally to add some pop to the colors I went around the words with a white paint pen and a Payne's grey brush pen. I added Payne's grey to the edges of the Daisy as well to help it pop! 

I hope you enjoyed my art journal page today! All supplies mentioned are available In Rebecca Baer's® store at the link below! Thank you for stopping by! Be sure to check out posts from my teammates each Tuesday and Thursday!

Twitter at @leslierahye | Facebook at leslierahye.| YouTube at leslierahye | Pinterest at leslierahye | Instagram at leslierahye


Thursday, March 19, 2015

March Monthly Smeared Ink Blog Hop | Alice in Wonderland Madness!


Good Morning Smeared and Smudged Family! This month I'm participating in the Alice in Wonderland Madness Members Blog Hop! Alice in Wonderland is one of my favorite subjects to art. SO MUCH FUN! I'm using a rubber stamp from Viva Las VegaStamps today...it's a stamp created from the illustrations of Sir John Tenniel--they have several made into stamps at VLVS.

 I created this little fat book page on a piece of canvas paper...I began by swirling on distress ink with my beautiful Enchanted Vine RebeccaBaer.com Collage stencil...the same stencil is later used to get the diamond pattern on the bottom right and the Swirl at the top left. I recently joined the Rebecca Baer Design Team and get to share with you often these awesome Mixed Media tools!! Her Stencil Brushes are AMAZING...more about that at another time! You're here to HOP!  The image was stamped on a piece of scrapbooking paper made to look like a dictionary page. As the image was bigger than my 4×4" square, I altered slightly to get both the Cheshire Cat and Alice on the page. The cat and Alice and a piece of the branch were colored with Prisma Pencils and then painted with Ranger Perfect Pearls Mist in Pearl to add SHIMMER. The cat needed some googly eyes to finish him off.

Below are details of this fun tile! Enjoy!
detail of the stenciled swirls and emboss pasted stencil.
copper creams were lightly brushed over the top of the raised stenciling.
detail of the swirl in the upper left.
again, copper creams were brushed over the swirls to help them pop

Cheshire Cat

Alice

Thank you for stopping by! I hope you enjoyed my project!
Be sure to hop to the rest of the Blog Hop Smeared Ink Family!

March Monthly Member Blog Hop

Black Dragon | Kristy | Nan | Teresa
 Leslie Rahye Maureen | Susan R. | Lisa
Sarah | Leigh | Susan S. | Jenn  | Ike | Fiona
Twitter at @leslierahye | Facebook at leslierahye.| YouTube at leslierahye | Pinterest at leslierahye

Friday, January 9, 2015

New Release with Cheery Lynn!!!

 Happy Friday everyone! Today on the Cheery Lynn Blog it's NEW RELEASE day!!! We have an amazing new release that's being unveiled at CHA 2015 in Anaheim, California starting today through the 13th! Be sure to hop over and check out the complete New Release! There are some fabulous samples from my teamies on the blog


New Dies Used :

Thank you for stopping by! I hope you enjoyed my projects!


*****
Remember there is still time to join the new challenge!!! Challenge #166 is Winter Whites There is a chance to win a $20 shopping spree at Cheery Lynn Designs. Thank you for stopping by today!
Twitter at @leslierahye | Facebook at leslierahye.| YouTube at leslierahye | Pinterest at leslierahye

Tuesday, December 30, 2014

Love Tag


Happy Tuesday everyone! Today on the Cheery Lynn Blog I share a valentine tag. I began by diecutting the snowflake mesh border out of acetate to use as a template. I spray-misted with opaque white over the top of kraft card to create the "texture" on the background. Next I stamped a grid pattern over the kraft tag and distressed and inked the edges with pink.]

For the ruffle on the bottom of the tag, I adhered a liquid glue to the back of the kraft tag and attached my crumpled Ankara Lace Border to the edge. A bit of Ankara Lace also peeks out of the side of the tag where the kraft  is ripped.

To finish off the tag, the snowflake doily was layered with the Two of Hearts and some scrolling bling. Love and You were cut and added to the bottom of the tag.

  Cheery Lynn Dies used
*****
Remember there is still time to join the new challenge!!! Challenge #165 is Thank You There is a chance to win a $20 shopping spree at Cheery Lynn Designs. Thank you for stopping by today!


Twitter at @leslierahye | Facebook at leslierahye.| YouTube at leslierahye | Pinterest at leslierahye

Tuesday, December 2, 2014

Winter Greetings


Happy Tuesday everyone! On the Cheery Lynn Blog today I share a seasonal holiday card using some of my favorite elements! Even though I  live in a VERY WARM state, snowflakes are one of my favorite design elements for winter. For this card I used the Snowflake Wonder Doily  along with Snowflowers sets and the Snowflakes plate. The elegant Fancy Deer paired with some shiny florals and bling. Below is a brief tutorial with all the tips.


Begin by cutting the Snowflake Wonder Doily without the center die out of Kraft and mist with an opaque white mist. I masked the center of the doily with a square. 

Once I was happy with the look of the outer of the doily, I misted lightly from high so that it looked like a light misting of snow.

I then returned my mask to the doily to mist with a blue-hued mica mist. I heat set this mist to hold the colors in place.

I placed a red square behind the doily to coordinate with the red flowers that will be placed on the card and to help the doily to pop off the card. I then layered on snowflakes and a Fancy Deer with antlers--to add extra sparkle the white pieces were misted with a Pearl white mist. This focal square was place on the top two-thirds of the card.

I then began layering my florals on top of the mini flourish band. I built the flowers and added beads to the centers with a clear lacquer. The petals of the leaves and flowers were also painted with the lacquer to add shine [see last photo for the full effect]

Bling was added to several snowflake centers to add more sparkle.


  Cheery Lynn Dies used

*****
Remember there is still time to join the new challenge!!! Challenge #161 is Tis the Season There is a chance to win a $20 shopping spree at Cheery Lynn Designs. Thank you for stopping by today!
*****

Twitter at @leslierahye | Facebook at leslierahye.| YouTube at leslierahye | Pinterest at leslierahye

Tuesday, November 25, 2014

Pink Snowflakes!


Happy Tuesday everyone!Today on the Cheery Lynn Blog I am once again playing along with this weeks challenge--Nontraditional Christmas Colors! I love using pink and lime green for holiday decorations. I have been creating these snowflakes for my tree and decided to share one with you.
I began by cutting several white card stock Royal Scandinavian Doilies--with solid centers.

I misted them with pink and Perfect Pearl Mists. I dried them with the heat tool and then fold up my doily...In half both directions perpendicular to the edges of the square. Next I fold the diagonally both directions. I cut to the center from one side and re-creased each fold to look like the doilies below.

 I lined up the doilies so that the corners line up on the top and bottom of my doily. I added a third doily to the back--lining up the top and bottom point.

Finally I cut a snowflake and misted it with Perfect Pearls. I added crystals and glued the snowflake to the top of the folded doilies. A string through the top makes the snowflake able to be hung on the tree.


 Cheery Lynn Dies used
Royal Scandinavian Doily (Set of 2)
Snowflake 2 - DL166

Thank you for stopping by! I hope you enjoyed my project!

*****
Remember there is still time to join the new challenge!!! Challenge #160 is Non Traditional Christmas Colors There is a chance to win a $20 shopping spree at Cheery Lynn Designs. Thank you for stopping by today!

Twitter at @leslierahye | Facebook at leslierahye.| YouTube at leslierahye | Pinterest at leslierahye

Tuesday, October 28, 2014

Zooming by with a Hi!


 Happy Tuesday everyone! Today on the Cheery Lynn Blog I share three of the new release dies. The first is the On the Road motorcycle die...this is just beautiful. The scrollwork in the detail is elegant and is perfect for a manly card but could also be used for a lady biker! I also use one of my favorite new dies...the SAY WHAT? set. The thought bubbles in this set are so versatile! Not only could you use them for their intent, but they make great "clouds of smoke" or clouds for scenes, running animals, bikes that go zooming by! LOVE! 

And then finally I used my most favorite doily!!! The Florence Filigree can be used several different ways. Today I cut the doily twice without the center die--once in red and once in orange. I used the orange base and I punched out the "negative space" of the red doily and placed it into the holes of the orange doily. These little swirly twigs would make a great wreath or background "twigs" for floral bunches. I like the way the red and orange kinda of resemble flames. In cutting without the center, I created a solid space for my motorcycle. 
Cheery Lynn Dies used
On the Road
Say What? (Set of 16)
Florence Filigree Doily (Set of 2)
Thank you for stopping by! I hope you enjoyed my project!

*****
Remember there is still time to join the new challenge!!! Challenge #156 is Borders and Edgers There is a chance to win a $20 shopping spree at Cheery Lynn Designs. Thank you for stopping by today!

Twitter at @leslierahye | Facebook at leslierahye.| YouTube at leslierahye | Pinterest at leslierahye