Showing posts with label watercolor. Show all posts

Tuesday, February 24, 2015

Springtime Dream Big Tag


Happy Tuesday everyone!Today on the Cheery Lynn Blog I am sharing a spring tag! I love the colors purple and green together and with watercolor it has a wonderful spring feel. I used the Dutch Daisy Borders, Boutique stackers and doilies to complete this tag! All pieces started out as file folder and were hand water colored with greens and purples. 

I began by cutting the border dies out of the bottom of the tag. I used the border edger and the negative space die from Border Set #2. The base was then watercolored with greens and spotted. The center of the Dutch Daisy Doily was used as a stencil to apply watercolor and ink in the corner. 

Next a ½" strip of folder was colored green and placed the ribbon-like strip from the Border Set #1 on top--it was also cut from file folder and painter purple.  The sentiment square was colored green and the negative shape of the Dutch Daisy Doily was stenciled on there as well. The doily and the sentiment square were layered on the tag. Crystal Bling was added above the cut daisies and a dot for the "i" in  the word "big". 


 Cheery Lynn Dies used


Thank you for stopping by! I hope you enjoyed my project!
*****
Remember there is still time to join the new challenge!!! Challenge 173 is anything goes There is a chance to win a $20 shopping spree at Cheery Lynn Designs. Thank you for stopping by today!

Twitter at @leslierahye | Facebook at leslierahye.| YouTube at leslierahye | Pinterest at leslierahye

Tuesday, February 17, 2015

Springtime Hugs


Happy Tuesday everyone! Today on the Cheery Lynn Blog I share a spring card complete with garden fence, flowers and a butterfly. I love the A2 stackers and how great they are for making layers on your card. This card uses 4 of the rectangles to create layers....the focal piece that I water-colored is a much larger stamp and I simply cut with an inner rectangle the portion I wanted to show on my card. The mini doily is inked around the edges to enhance the laceyness of the doily. A mini flourish, mini butterfly and tiny flowers complete the look of the card. I'm ready for spring! only four more weeks!


 Cheery Lynn Dies used
*****
Remember there is still time to join the new challenge!!! Challenge 172 is Shaped Card There is a chance to win a $20 shopping spree at Cheery Lynn Designs. Thank you for stopping by today!

Twitter at @leslierahye | Facebook at leslierahye.| YouTube at leslierahye | Pinterest at leslierahye

Thursday, January 22, 2015

Delightful Thursday | Relaxing with Barnaby

It's Delightful Thursday and the Digital Delights design team is sharing inspiration on the Digital Delights Blog today! 

Today I'm using my favorite Lovin and Relaxin Barnaby! He's so cute in his hammock. I colored him with Distress Markers and did a few watercolor techniques with them to make the doily background pop!  I hope you enjoy my card! Thank you for stopping by! 

Leslie Rahye - leslierahye
Lovin and relaxin Barnaby (colored)Lovin and relaxin Barnaby
Lovin and Relaxin Barnaby
SALE

Be sure to check out inspiration from our team on the blog today
and don't forget all the wonderful images in our January Release


Twitter at @leslierahye | Facebook at leslierahye.| YouTube at leslierahye | Pinterest at leslierahye

Thursday, November 6, 2014

New Release and Weekly Challenge | Patterns

It's time for a new challenge with Digital Delights by Louby Loo! This week at Delightful Challenges our challenge is Patterns [use patterned paper]! The new release has some beautiful patterns including this great blue toned vintage greeting. It looks terrific with my watercolored Chimney Cat! I added some flocking to the hat and snow glitter to the chimney top and the "roof line" along with a fun gold button for the "bell"! I hope you enjoy my card! Thank you for stopping by!


Card stock : Neenah
Markers : watercolors and pastel pencils
Accessories : art glitter glue, glitter and glue dots

*****
It's Time for our November Release

Our Theme for this week is:
Patterns
(include patterned paper)
We were being sponsored by our own


Prize

Now it's Your Turn!
You are not required to use a Digital Delights 
Image to join in the fun 
but if you do, you can enter THAT project TWICE.
To enter twice when using a Digital Delight image,
for your 1st entry use your card link.
For your 2nd entry use your blog address
 and add "2nd entry" after your name

Otherwise, only ONE entry person
**Please be sure to follow the challenge theme and rules or it will be removed.
Twitter at @leslierahye | Facebook at leslierahye.| YouTube at leslierahye | Pinterest at leslierahye

Monday, October 6, 2014

Happy Halloween


if you are looking for my 31 days of Halloween post, it is delayed due to medical emergency--it will be up later today.


 Happy Tuesday everyone! On the Cheery Lynn Blog today I share a fun Halloween card. I die cut the Lacey Pumpkin Corner in orange. I kept the orange pieces of the pumpkin to fill in the lace after I colored the lacey die cut with brown. When I layered the lacey corner onto the distressed matte, I glued in the orange pieces and colored in the leaf pieces with green watercolor. 
I layered two of the sentiment tags and added the small Happy Halloween sentiment to the front. I completed the card with some penwork and white chalk.


Cheery Lynn Dies used

*****
Remember there is still time to join the new challenge!!! Challenge #153 is Halloween There is a chance to win a $20 shopping spree at Cheery Lynn Designs. Thank you for stopping by today!


Twitter at @leslierahye | Facebook at leslierahye.| YouTube at leslierahye | Pinterest at leslierahye

Sunday, April 27, 2014

Spring is Music to my Eyes


This article can be read HERE.

Wednesday, April 23, 2014

Never Give Up!


  Happy Wednesday everyone! Today on the Globecraft and Piccolo Blog I share with you a card that would be great for a graduation or any other note for some accomplishments. I love the sentiment "The impossible is often the untried." This card is LAYERED with yummy emboss powders for a masculine steampunky grungy feel.


The front of the card is created using a gear stencil...I applied Enamel Powder Adhesive over the stencil and dusted with Real Rust powder. I heat set the powder and then edged the card stock with the adhesive making wider patches in places. Mermaid Tears was layered on top, leaving translucent patches on the stenciled background. I love the chunky glitter in Mermaid Tears and it's translucency--you can see the background through the emboss enamel.

The focal piece was created by stamping the sentiment and embossing it with Micro Black first and then masking the sentiment to stamp the rest of the images. That was also dusted with Micro Black and heat set. The card was colored with watercolor washes and mounted on a piece of card stock edged with Victorian Bronze. 

The inside of the card has a layered strip--edged with Victorian Bronze and a large panel stamped on the edge with brushes--and embossed with Victorian Bronze. This panel was also edged with the Mermaid Tears  to tie it into the front of the card. The focal panel was placed so that it extends over the edge of the shortened front and over the stamped side panel.

Globecraft & Piccolo Products used
  I hope you enjoyed my project! Thank you for stopping by today!

Twitter at @leslierahye | Facebook at leslierahye.| YouTube at leslierahye | Pinterest at leslierahye

Tuesday, April 8, 2014

Anything Goes in a Matchbox!


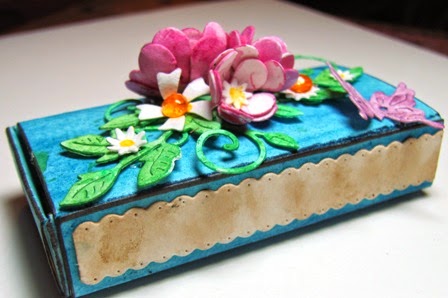
Happy Tuesday everyone! Today on the Cheery Lynn Blog I share a fun a project for the Anything Goes Challenge. I 'm using the medium match box die to create a box for a mini book that I created with the French Flair die! I LOVE these little boxes! I can't wait to make more!

Cheery Lynn Dies used
Tiny Flower Kit (Set of 3) - B376
Mini Fanciful Flourish - B117S
French Flair - Classic LG Stackers Nesting Dies - XL-12
French Flair - Scalloped LG Stackers Nesting Dies - XL-13
Alison's Ribbons - B335
Miniature Rose - B152
Medium Rose - B154
Flourish Leaf Strip - B178
Matchbox Medium (Set of 2) - B329


To created the mini book I die cut out a scalloped French Flair out of watercolor paper that was half as wide as the matchbox. That way when it is folded in half it it will fit I then . I cut pages for the book from copy weight paper. The small French Flairs were folded and trimmed and glued together on the cut edge and placed in the covers. The cover was watercolored using Derwent pencils.

all elements of the box and flowers were created with the water color paper. I love the effects you get by watercoloring one side of the paper and dabbing the back side for a hint of color. Dew Drops and watercolor completed the center. All surfaces were hand colored with Derwent and water.

The mini book in this matchbook is perfect for your wee notes , secrets, passwords...whatever small item you need to keep up with!

 Thank you for stopping by!! I hope you enjoy my card!

*****
Remember there is still time to join the new challenge!!! Challenge #127 is Anything Goes There is a chance to win a $20 shopping spree at Cheery Lynn Designs. Thank you for stopping by today!


Twitter at @leslierahye | Facebook at leslierahye.| YouTube at leslierahye | Pinterest at leslierahye

Monday, August 19, 2013

Tutorial | Mixed Media Initial Canvas with Design Memory Craft Faber-Castell

Good evening everyone! leslierahye here to share with you this fun canvas that I made for my Samantha [aka Fancy Pants] with the beautiful Cheery Lynn Designs Dies and the scrumptious Faber-Castell Gelatos and Aquarelle Watercolor Pencils. We have been redoing the kids' room and the wall just screamed for some initial art! I hope you enjoy my project!
To create your own initial canvas
Assorted Cheery Lynn Doily and Flower Dies
8×10 canvas
empty mister bottles
Water Brushes
gesso
Beacon Fast Finish Decoupage
Beacon 3-in-1 

I gathered my supplies and my white hand-crafted flowers and doilies.

Before I got started gluing, I created a pink mist with the Watermelon Gelato. I sliced off some of the creamy Gelato into thin slivers and placed it into a mister bottle. I then added water and used a small stick to stir the mixture--helping to breakdown the Gelato further by mashing the stick against the side of the mister. When I thought it was dissolved enough, I gave the mister a good shake to disperse the color throughout.

Next I printed an outline of the letter "S" using my Publisher program. I choose the free font Big Top for my design. I sized the letter to about 650 points to fill the canvas. Once printed I tested out the flowers to see if they would fit nicely in the space I had. 
Next I trimmed out my initial to make it easy to trace and laid out the entire canvas with the doilies, the "S" and the flowers. Once I liked the positioning, I traced the letter onto the canvas with a pencil.
With Beacon Fast Finish Decoupage I glued my doilies firmly to the canvas and let them dry.
Next I attached my flowers using Beacon 3-in-1. I started with the big flowers first and then added leaves and smaller flowers until I was happy with the placement.  I set the canvas aside to dry for a little bit.
 
It is now time to coat the ENTIRE canvas with gesso! This coating gives the WHOLE canvas the same finish so the different mediums will act similar over the entire surface. This also provides the opportunity to create some "bubbles" with the heat tool and add an extra fun texture.  But more on that later!

Now the REAL FUN begins! Get out your Gelatos! I started with Margarita Mix and Snow Cone and colored direct to canvas around the "S" concentrating the Snow Cone color on my doilies.. Next I spritzed water onto the canvas to activate the Gelatos and painted the color until smooth all over the canvas leaving the flowers alone. As the colors around the doilies blended, I added back over the top more of the Snow Cone to make them bluer. 
Once I was happy with the background, I picked up the Gelato mister that I created above and sprayed the "S". I added color in layers, drying with my heat tool between layers. I allowed some over spray to stay on the canvas but if it got too thick I simply dabbed it with a dry cloth to pick up the extra.
While drying, I concentrated some heat around the doilies to bubble up the gesso that got stuck in the details of the die cut. I love these little bubbles that remained.
Once dry, I came back to the flowers with yellow and turquoise Faber-Castell Aquarelle pencils. I put yellow on some of the flower centers and yellow and turquoise on the leaves. I activated the watercolor with a water brush leaving the centers with a hint of yellow and the leaves with a hint of green. I finished with the coloring by adding a swipe of the Coconut white Gelato to the centers of the big flowers to bring in a small highlight! 
You know I'm not done until I've added a little doodle. As a final touch, I doodled with my Faber-Castell PITT Artist Pen in Black Small in a few areas around the "S". These pens are perfect as they are waterproof India Ink and come in several sizes for your doodling needs! 

I hope you enjoyed my project! Thank you for stopping by!

Saturday, August 17, 2013

Fun with Letters Challenge!

supplies used
8×10 canvas
gesso
Beacon Fast Finish Decoupage
Faber-Castell Gelatos : Coconut, Watermelon, Margarita Mix and Snow Cone
Faber-Castell Art Grip Aquarelle : 108, 156
Faber-Castell PITT Artist Pen Black S

Shop Cheery Lynn Designs
This week the challenge at Cheery Lynn Designs is
Fun with Letters
Here are the rules:
  • You MUST follow the theme and use at least one Cheery Lynn Designs die, of course, we would love to see more than one. 
  • You MUST add a link to your blog post in the InLinkz at the end of this post; no back posting, only new projects are allowed
  • You MUST link to this challenge in your blog post or on your gallery post
  • You may only enter the challenge ONCE per week.
The winner will be chosen based on merit by Cheery Lynn Designs. They will receive $20 towards shopping at the Cheery Lynn website. The challenge will end on Saturday night at  6 p.m.

Friday, July 19, 2013

Test Driving the Faber-Castell Floral Gallery kit at Altered Pages

Happy Friday everyone~! I wanted to share with you the fun I've been having with the five little pencils in the Faber-Castell Floral Gallery Kit that I got through AlteredPages.com. This is a great kit to introduce you to watercolor pencils and watercoloring on canvas. It comes with a terrific instruction booklet that goes through various techniques that you can use with these pencils. It includes 4 pre-drawn boards for you to color and also a "practice" palette board to experiment with the colors. 

Following the directions in the book on getting a range of colors from the five pencils, I proceed to test drive the colors in a traditional manner. I colored lightly and with more vigor onto the rectangles of the canvas and then applied water to my brush [included in the kit] and activated the pigment that I had laid onto the canvas. [first two rows above]. Then I proceeded to see what colors I could create with the 5 pencils I had. I was impressed at the range of colors with just adding equal parts of color--of course there are millions depending the percentage of each color that you add to the mix.


In the instruction booklet, it was also suggested that you could use a piece of paper as a palette to mix the colors and then apply THAT to the canvas...in the bottom  3 rows of the canvas board in the previous photo is what the paper pallet colors looked like...they have a super pastel feeling quality to them. Again, it was easy to get a terrific range of color with this technique. My only recommendation here is to be generous with the water. On paper your color easily soaks into the paper once activated with water--you need more water to have paint to apply to the canvas!

After my "test drive" I decided to work on one of the canvases that looked similar to a sunflower. Since I had used my pencils considerably playing and checking out the colors, I needed to sharpen them--there is a wonderful little sharpener included in your kit. Of course I did not want to waste the shavings that were made and so I dumped them gently into a little paint pallet and used them to mix and create the sunflower canvas. 

Working from the background to the foreground I first layered washes and then more concentrated colors to bring out the details of the flowers. Many stop with just the application of color onto these little canvases but I find I like a little doodling with my watercolor. 

I pulled out a variety of sizes of Sharpie Markers and proceeded to tangle my favorite flowers over the watercolor. I LOVE the effect. The Sharpies worked beautifully over the Faber-Castell Aquarelle watercolors and canvas. The kit comes with 2 flowers that look sunflower like and 2 that look Tiger Lily like. My plan is to gesso the tiger lily boards and make more sunflowers so that I have 4 happy sunflower panels! 
Thank you for looking! I hope you try this super kit...experiment to see all the colors that you can get with 5 little pencils! Hop on over to AlteredPages.com to pick yours up!