Showing posts with label Sakura Hobby Craft 3D Crystal Lacquer. Show all posts

Tuesday, December 16, 2014

Shaking Up Some Cheer


Happy Tuesday everyone! Today on the Cheery Lynn Blog I am playing along with this weeks challenge Sparkle and Shine. I have created a shaker card with the circle stackers and Horizon Circle set! 

I love how easy it is to cut a frame for your shaker I simply lined up a smaller circle inside my Horizon die, secured them with some washi tape, and cut them together in my machine.
I cut all of my snowflake pieces in white which was a little stark compared to the rest of my paper. I used pearl mists to add gold and pearl shimmer to my snowflakes and dull the stark white card stock.

For the shaker I cut a circle for the background and a circle out of clear acetate. I adhered the acetate to the frame with a clear lacquer.

I then added foam tape to the back of the frame to give my sequins and sparkles a space in which to move. If you desire chunkier shakings use another layer or two of foam tape. Make sure you have all of your pieces touching so there are no holes for shakings to escape!

I stack my shakings in the middle before adhering the frame. Here I used sequins, snowflake glitter and some crystals.

When you adhere the frame, make sure all sides are secure and then give it a shake to make sure it works! 

I added my shimmer snowflakes to the frame and then used a clear gem as a spacer for a smaller snowflake to be placed on top. It added just the right height and was clear so could not interfere with the top layer of snowflake

As a final touch I added crystals here and there to centers and along the flurry strip!


  Cheery Lynn Dies used
*****
Remember there is still time to join the new challenge!!! Challenge #163 is Sparkle and Shine There is a chance to win a $20 shopping spree at Cheery Lynn Designs. Thank you for stopping by today!

Twitter at @leslierahye | Facebook at leslierahye.| YouTube at leslierahye | Pinterest at leslierahye

Tuesday, December 9, 2014

An Ornament Card


Happy Tuesday everyone! Today on the Cheery Lynn Blog I am playing along with this weeks challenge Red & Green. I chose to create an ornament with the Circle Stacker Die and assorted shaped dies and doilies.  Below is a brief tutorial with all the tips.

I  began by aging the papers that I die cut with ink and layered them along with the Dancing Snow Flurries.

I created pine branches on brown jute strung. I began by straightening and stiffening the string with a coating of lacquer.

Once straight, I spun the lollipop strips onto the jute string in a fashion to create pine branches.
 
The circle  die cut was also aged with ink and then smeared with red oil pastel to create a dimensional ball shape. The "ball" was attached to the card base with foam tape and the pine branches and poinsettias were attached with lacquer. a pine cone was created with a cutie die and lacquered to create shine. poinsettias and the bow and pine cone topped the "ball" 

  Cheery Lynn Dies used
*****
Remember there is still time to join the new challenge!!! Challenge #162 is Red & Green There is a chance to win a $20 shopping spree at Cheery Lynn Designs. Thank you for stopping by today!

Twitter at @leslierahye | Facebook at leslierahye.| YouTube at leslierahye | Pinterest at leslierahye

Tuesday, December 2, 2014

Winter Greetings


Happy Tuesday everyone! On the Cheery Lynn Blog today I share a seasonal holiday card using some of my favorite elements! Even though I  live in a VERY WARM state, snowflakes are one of my favorite design elements for winter. For this card I used the Snowflake Wonder Doily  along with Snowflowers sets and the Snowflakes plate. The elegant Fancy Deer paired with some shiny florals and bling. Below is a brief tutorial with all the tips.


Begin by cutting the Snowflake Wonder Doily without the center die out of Kraft and mist with an opaque white mist. I masked the center of the doily with a square. 

Once I was happy with the look of the outer of the doily, I misted lightly from high so that it looked like a light misting of snow.

I then returned my mask to the doily to mist with a blue-hued mica mist. I heat set this mist to hold the colors in place.

I placed a red square behind the doily to coordinate with the red flowers that will be placed on the card and to help the doily to pop off the card. I then layered on snowflakes and a Fancy Deer with antlers--to add extra sparkle the white pieces were misted with a Pearl white mist. This focal square was place on the top two-thirds of the card.

I then began layering my florals on top of the mini flourish band. I built the flowers and added beads to the centers with a clear lacquer. The petals of the leaves and flowers were also painted with the lacquer to add shine [see last photo for the full effect]

Bling was added to several snowflake centers to add more sparkle.


  Cheery Lynn Dies used

*****
Remember there is still time to join the new challenge!!! Challenge #161 is Tis the Season There is a chance to win a $20 shopping spree at Cheery Lynn Designs. Thank you for stopping by today!
*****

Twitter at @leslierahye | Facebook at leslierahye.| YouTube at leslierahye | Pinterest at leslierahye

Wednesday, November 19, 2014

Joyful Tag


 Happy Tuesday everyone! On the Cheery Lynn blog today I shared a tag to go along with this weeks challenge! I LOVE tags and the new Alpine Flourish Doily makes the perfect tag! I began by cutting a kraft tag to go behind my die cut. I then layered the Alpine Flourish Die onto the tag with 3 dimensional glue dots so that it would have a bit of dimension. 


Next I added my poinsettias that I had created using the strip die. Once cut from red card stock, I shape them with a stylus on a foam pad. I then stack them, little one on the top and the next smallest below it. I add little yellow prills for the center. Love the look here.  

I cut the Joy to the World Sentiment from the wreath set in both chocolate and red. I layer them and wipe a layer of lacquer over the top. 
To adhere to my tag I coat the entire solid are with lacquer and place my sentiment in the center. The twiggies are cut from the same brown and green using the wreath strip. They are layered under the poinsettias. The flowers are attached last and trims are run through a hole I punched in the tag.

Cheery Lynn Dies used
*****
Remember there is still time to join the new challenge!!! Challenge #159 is Tag You're It There is a chance to win a $20 shopping spree at Cheery Lynn Designs. Thank you for stopping by today!

Twitter at @leslierahye | Facebook at leslierahye.| YouTube at leslierahye | Pinterest at leslierahye

Tuesday, November 4, 2014

I Spy a Birthday!


 Happy Tuesday everyone! Today I am sharing on the Cheery Lynn Blog a few more dies from the recent release. The I Spy binoculars are great! They are perfect for layouts involving sightseeing and hunting/target shooting themes. For a cheeky birthday card, they are great for spying a milestone birthday--"Lordy, lordy look who's 40!" I just couldn't resist. The binoculars are detailed with some pan pastel and glossy accents to bring out the features of the die cut. The Mirror Mirror Doily Frame is perfect to create a mirror to look into for this card. I cut it out of a beautifully colored coffee bag that I upcycled. To further accent the theme of time, I added the Gear Mesh to imply clock gears...as time passes. 
*****
Remember there is still time to join the new challenge!!! Challenge #157 is Give Thanks There is a chance to win a $20 shopping spree at Cheery Lynn Designs. Thank you for stopping by today!

Twitter at @leslierahye | Facebook at leslierahye.| YouTube at leslierahye | Pinterest at leslierahye

Friday, April 26, 2013

Follow the Art | Another Mixed Media Challenge!

One of my favorite parts of art journalling and mixed media art is what I call "following the art." I have talked to the AlteredPages.com owner Jean about this a number of times over the past year. What happens is I will have a plan in my head of how I want something to progress and I will sit down to do that project but the end product that I had in mind is not where I end up...I "follow the art." That is how this project began. I initially wanted to attempt to replicate a technique done with other products and see if I could make it with products available at alteredpages.com. The main difference being that rather than using resin, I was using lacquer. Now before you go and say "well there's your problem," here's my reasoning...I can get the resin look with lacquer successfully, I think in this particular technique it should work in a similar fashion...so let's give it a whirl. Over on the AlteredPages.com blog today I go through the experimentation that occurred to create the focal piece on this page--please be sure to check it out!

Creative_Dare
I'm entering this project in  TracyWeinZapfel Studios April Creative Dare--details of the dare is below. Check it out...it's a great way to get your creativity flowing! Thanks for the inspiration Tracy!
Your Creative Dare is to think of FIVE WORDS Describing what your life means.  Your purpose!  What FIVE WORDS encompass what you want to be remembered for?  
I have recently embraced the power of arting my words....I am arting this  year and focusing on the word BLOOM. It has been an amazing focus for me and has manifested many powerful and awesome opportunities for me this year so far! So...of course I was intrigued in writing down how I wanted to be remembered. But for me I had to first think of who I was...well that was quasi-easy : Mom, wife, daughter, friend and mentor. Hey look, 5 things--Sa-weet! But how did I want to be remembered...those things are terrific and I would be happy with that but I felt the challenge was looking for more adjective type words not noun type words...that was more difficult. I took it to my fan page. I was honored to see how others view me now...so many kind and wonderful warm loving things. I love my fans...they are awesome. I then asked my kids...surprisingly they never said, "mean, unfair, bossy...". Instead I got "Awesome, talented, smart." I love these people. They have a great mom to teach them to be so kind. With that in mind, and with the words of my fans in my mind, I came up with these five and I hope I can live up to that: Passionate, Creative, Kind, Honest and AWESOME! Thank you everyone for your input!
I dare you to incorporate the following elements from our Sponors:  The Crafter's Workshop Templates and Beacon Adhesives 


I accept your dare and used 2 Crafter's Workshop Templates and my favorite Beacon 3n1.

Thank you for checking out my blog! Please feel free to follow me and subscribe through bloglovin so you never miss an update!  I hope you enjoy experimenting with your supplies and don't be afraid to "follow the art."

Wednesday, January 30, 2013

Weekly Challenge | Red & White

It's time for a new challenge with Digital Delights by Louby Loo! This week at Delightful Challenges our challenge is a Red & White project. This week I created a gate fold Valentine card with Barnaby and Beatrice Bee from the January Release. They are so cute! I just love these sweet bees! I hope you enjoy my project! Thank you for looking!

For this card

Digital Stamps : Beatrice, Barnaby, Love me Accessories & Love is in the Air Sentiments
Digital Papers : Love me Digital Paper Set
Markers : BIC Mark Its
Accessories : Ribbon, silk flowers, buttons, glitter, Sakura Crystal Lacquer

In honor of this super cute release, this weeks challenge we would love to see 
Red & White
You are not required to use a Digital Delights Image to join in on the fun
but if you do you can enter TWICE. 

To enter twice when using a Digital Delight image your 
1st entry use your card link
 2nd entry use your blog address and add 2nd entry after your name
**Please be sure to follow the challenge theme or it will be removed

We have a wonderful Sponsor this week

This week's prize

Wednesday, November 7, 2012

Weekly Challenge : Let it Snow!

 It's time for a new challenge with Digital Delights by Louby Loo! This week at Delightful Challenges our challenge is Let it Snow. Even though in the part of Texas where I live snow is a rarity, I do love the idea of snow! I also love the cute little Ditzy Reindeer that was part of this month's new release! To create this shaped card I used the washer matting technique that I had shared on Tuesday Tutorials with Digital Delights. I added hand made pipe cleaner snowflakes for dimension and "snow" to my card! I hope you enjoy him! Thank you for looking!

For this card

Digital Stamps : Ditzy Reindeer, Snow Sentiments
Card Stock : Bazzill Basics
Markers : BIC Mark-its
Accessories :  pipe cleaner and embroidery floss, Crystal Lacquer


This weeks challenge we would love to see 
let it snow (snowflakes)
You are not required to use a Digital Delights Image to join in on the fun
but if you do you can enter TWICE. 

To enter twice when using a Digital Delight image your 
1st entry use your card link
 2nd entry use your blog address and add 2nd entry after your name
**Please be sure to follow the challenge theme or it will be removed

We have a wonderful Sponsor this week
You could win $20 to their store!! 

Saturday, September 29, 2012

VLVS! All Hallow's Eve Party | Day 7


Happy Saturday and welcome to the last day of the Viva Las Vegastamps! week long celebration of Halloween. Viva Las Vegastamps has tons of Halloween related stamps including some amazing new plates of stamps--which I'm working with here. During this week there will be fun games to play, some voting to do and some prizes to be won. Hop on over to the Viva Las Vegastamps Blog to learn about all the details. There is a link up below to keep you on track of all the great designers in the hop! Be sure to check daily!
Today I made a fun texurey ATC by building a base of string and tissue paper with Crystal Lacquer. I inked up Kromecote and stamped Frankie, the moon and the sentiment with Black Paris Ink and heat embossed them with the High Gloss EP. I bubbled up some lacquer on the background for some addd texture and  fussy cut out Frankie and the moon, and block cut the words adding them to the card with Lacquer and foam tape.

 For this project:
 distressed inks
black ink [Paris Trunk Ink]
tissue paper & string


Thank You for stopping by~

Saturday, September 15, 2012

Charmed I'm Sure with Altered Pages


Happy Friday everyone! Today on the AlteredPages blog I share with you how I made my potential craftastrophe into a craftertunity! Join me on the Altered Pages Blog to share my journey to a better art piece! 

Friday, September 7, 2012

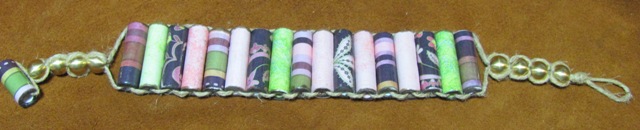
Stash Busting | Column-Bead Bracelet with leftovers

I have a stash--a collection of scrappy/crafty stuff that has been growing for 10 plus years. I am not normally one to hold on to scraps. I usually share "left overs" from projects with my crafty kids or they go into the recycle. Recently however I started using them to make these fun column beads and now I'm totally addicted. This bracelet is constructed with scraps from another project and some hemp thread used in macrame bracelets and some large holed beads.
It is so simple to make and comfortable to wear! I love all the possibilities of this craft--spirit jewelry, cards with coordinating gift bracelets, bracelets for every outfit!!!
I started the bead tutorial one week on The Odd Show Live Reboot and then finished construction of the bracelet on the next week. The Odd Show Live is a consortium of artists bringing their crafts to you each week where you can chat and interact. You can follow The Odd Show Live on their facebook page and be informed of their daily shows and events! Both tutorials are included here.

The Method

For this project you will need
about 2 yards of hemp twine
13-15 strips 1"×5" 
1 strip  ¾"×5"
6-8 large holed beads
Sakura Crystal lacquer


Stash Busting

I have been watching a number of fellow crafters join "stash busting" challenges and while I am always up for a good challenge, I am keeping this my personal challenge. I will however share a couple of times a month a project I have made in my stash busting adventure on the blog in the hopes of motivating you to do the same!
Thank you for looking! Happy Stash Busting!!!

Friday, August 31, 2012

Faux Ceramic Tile Tutorial with Altered Pages


Happy Friday everyone! Today on the AlteredPages blog I am sharing a super easy tutorial that would be fantastic as a hostess gift or a seasonal decoration for your message center or refrigerator! I'm a magnet junkie at my house...constantly we are crafting one magnet or another and my favorite are the ones that I've crafted on ceramic tiles. The problem with the ceramic tiles however is they are HEAVY and even with the super strong magnets can slide on your surfaces! That's where the EcoArtBoard is AWESOME. It has the thickness of a ceramic tile but none of the weight! Check out my procedure for creating these fabulous faux ceramic tile magnets!


I love how they look! I hope you enjoyed my project!
Only 2 more months of Halloween crafting left!!!

Monday, August 27, 2012

Altered Travel Case


Happy Monday Morning everyone! A year ago next week I began my 1st term with Sakura Hobby Crafts--sharing the allure of this amazing product here and on the Crystal Lacquer Blog. For my first project with you, I concentrated on the high viscosity lacquer in the pink and white bottle with Luggage Tags for my son and for his girl friend for their band instruments. It is merely a coincidence that today's project is an upcycled travel case; but that I'm focusing on the lacquer in the pink and white bottle again is not! I've altered this case to hold my felting tools and wool roving! I hope you enjoy my project! 

The Method

I began with a travel case that my friend Marie found at a garage sale for me! I new immediately that I wanted to make it into something for my fiber crafts. I sanded the surface of the case to remove some of the smoothness giving the paper and lacquer something to hold onto. 


I layered tissue paper and white paper to the entire surface of the travel case--adhering it with brushed on Crystal Lacquer--until I was satisfied with the look of it. I sanded the metal hinges so that they looked like brushed metal. I added back more paper as necessary to cover any blue that showed through from the case.

Finally I used these fantastic pink glittered letters that my friend Molly gave me to spell out Felting on top of the case. I adhered them to the top with Crystal Lacquer. I love the clean feeling the white lacquered paper gives the case. It's the perfect home for my felting tools.

...and goodbye

It is with this final project that I bid you farewell on the Sakura Hobby Crafts Design Team. I have enjoyed my time creating crafty projects for you using amazing Sakura Hobby Crafts Crystal Lacquer and Sakura products.  I will continue using them in my paper crafting and altering projects for years to come. You can continue to connect with me as I travel my crafty adventures here on my blog or here. Thank you for looking!