Showing posts with label masks & stencils. Show all posts

Friday, July 3, 2015

Thursday, May 14, 2015

Stencilled Fiber Art Necklace Pendants with Rebecca Baer™


Good Morning! Today I've created little fiber art necklaces and pin using Rebecca Baer­® stencils! I love handmade jewelry and am fascinated by the textures and mixed media feel of these little denim pendants. This is super easy and with one 6" square of fabric you could make a dozen or so pendants for sharing with your friends and family! I hope you enjoy my tutorial below!

Begin with a piece of fabric. I am using upcycled denim. I chose this beautiful Secret Garden stencil in the small for the above pendant. I also chose the lovely Enchanted Vine Stencil in small for a second project that I'm sharing below using the same technique.
Secret Garden Stencil - Product Image Enchanted Vine Stencil - Product Image

I applied Embossing Powder Adhesive to my fabric through the stencil so that it looks like it was stenciled with a darker shade of blue. Then I applied Embossing Powder and heat set it to melt the powder onto the jeans. 


I have not tested this for something that would need to be washed so I don't know if it would stand up to the wear and tear of that process. The results of the embossing powder on the denim is awesome though!


Above you see the result of a turquoise colored emboss powder on the denim...striking. However I wanted something with a bit more depth for the pendent today. For today's pendant, I decided to add one more element--I misted an opaque color mist first onto the denim.


Next I turned my stencil and proceeded with the embossing powder adhesive and the emboss powder...you can see the effect in the details of the pendant below.


I finished my pendant by fashioning a little hanger with some black annealed wire. I cut a strip of my stenciled fabric and attached it to the hanger with sewing. I then added a selection of charms to the front. Then I raveled the bottom of the pendant by cutting strips and removing the shorter fibers that remained. 


This little friendship pendant was completed in a similar manner...I cut little strips and attached it to the safety pin. I then attached a little bitty pin with beads to the front. 

All supplies mentioned are available at the link below! Thank you for stopping by! Be sure to check out posts from my teammates each Tuesday and Thursday!


Twitter at @leslierahye | Facebook at leslierahye.| YouTube at leslierahye | Pinterest at leslierahye | Instagram at leslierahye


Thursday, April 23, 2015

Fairy Magic Tag with Rebecca Baer®

Fairy Magic

Good Morning! Today I've created this wonderfully textured mixed media tag with Rebecca Baer­® stencils, brushes and mediums! It reminds me of fairies with the swirls and glitz and glitter on the tag. I hope you enjoy my tutorial below!


Enchanted Vine Stencil - Product ImageFlexi-Spreader - Product ImageRB Stenciling Gel - Product Image

I began with a manila folder tag the Enchanted Vines Small Stencil and Rebecca Baer's Clearly Elegant Stencil Gel. While you could use the stencil straight on, I turned it various directions to get the design in specific places for my tag. I wanted lots of texture on the right side as the left side would have burlap and corrugated board. I smeared my gel with the Flexi-Spreader to get a thin coverage on my stencil.


I put my tag aside to dry and tested out some pieces to put on the left. I used a strip of burlap paper and an ATC-sized corrugated rectangle for the left. The easiest way to get the top layer off of a piece of corrugated card board is to mist the top with water, let it set for a minuted and then pull off the top--it will come off in one piece!


RB Classique(TM) Angles - Product ImageTriple-Well Brush Washer - Product ImageAmericana Acrylic Paint - Product Image
With a turquoise and apple green acrylic paint and the RB Classique™ Angles brushes, I painted over the stencil gel and the tag, adding the green to the edges only. The triple well brush washer is awesome for providing you with clean water and a place to wash a messy brush. It will be perfect for my class this weekend where I need a water container to wash brushes as it collapses down to a single well for travelling! 
Once the paint was dry, I rubbed on some brown distress ink to pop up some of the texture and define the edge of my tag. The "grommet" was also inked with the brown and glued into place. 


I also added paint to the burlap and the corrugated board to tie the tag together. These were glued into place.


Fleur De Lis Stamp  - Product Image

This fleur de lys stamp was first stamped with the same brown distress ink and then a second time with antique gold paint to get the final result below. 

Brads & Fasteners

Final details included adding this label to the corrugated board [the rectangle was cut out and removed to accommodate the glass vial of glitter]. Rebecca Baer's Custom Brad Kit which was the perfect color and perfect canvas texture. White and black charcoal doodles were added to the edges and inside to accent the elements of the stencil and stamp. A spritz or two of Radiant Rains was added to the tag to give it a little more glitz and complete the magical feel.

All supplies mentioned are available at the link below! Thank you for stopping by! Be sure to check out posts from my teammates each Tuesday and Thursday!


Twitter at @leslierahye | Facebook at leslierahye.| YouTube at leslierahye | Pinterest at leslierahye | Instagram at leslierahye

Thursday, April 9, 2015

The Season of Kindness Field Book


Lace Tile - Product Image
Omni Board Lace Tile
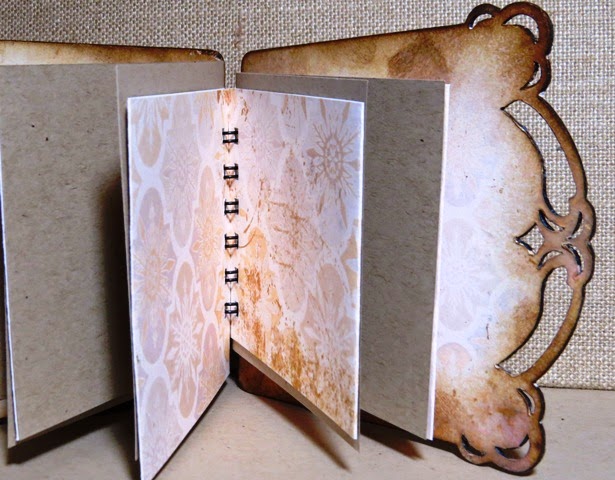
Good morning! Today I'm sharing my first official post with Rebecca Baer­® Inc. I have created a field book with the Omni Board Lace Tile. I love making little books and saw this tile and knew it would be covers of a book! A field book is something that you can take with you--you know, out in the field. I filled this one with blank pages and pocket pages using my Bind-it-all so that I could take notes, or doodle, or collect leaves and flowers. This is one of my favorite parts of the year and this will fit nicely in my backpack! The Omni Board comes in several shapes and sizes and is an awesome surface. It's lightweight, paintable, sandable, excellent for Mixed Media!

Painted Digital Papers | Cafe - Product Image
Painted Digital Papers | Cafe
I prepared my tile for covering with Rebecca Baer­® Painted Digital Papers by applying 2 thin layers of Gilded Stenciling Adhesive. I let them dry to clear both times and then layed the paper over the tile and secured with my brayer. I next cut around the tile with a craft knife and traced inside the lace pieces to get the paper out of the curvy pieces. This process can be tedious. I use little pieces of sand paper and dental tools to help remove excess glue and paper from the lace holes. I sand all edges of the tile and lightly sand over the "lacy" part. Next all edges are inked with brown distress ink.

Rebecca's Painted Digital Papers are gorgeous. I love this Cafe pack. The lighter papers are great to apply stenciling and stamping on top of and the darker colors are so rich and warm...just beautiful. I printed my papers to use for covering the Omni Board on regular weight bright white paper using an HP color laser printer. For the inside pocket pages I used a lightweight bright white card stock.


The Omni Board Lace tile comes with 2 pieces and some spacers. There is a square that can be popped up with the spacers on the front of the tile. I prepared the front with sanding and adhered light paper on top as above. 

This time I used the beautiful two-part daisy stencils. The two-part stencil provides you with a silhouette of your image and a detail line of your image. This is great for the doodler in me. I could use just the silhouette and create my own doodles or use the detail stencil for the perfect line or highlights to the flowers. Before stenciling the silhouettes, I position my flowers and the stamp I want to use to see how they will fit on the front tile. When I'm happy with the arrangement I secure my 1st stencil with the RB Mini Masking Tape--I LOVE this little adhesive! It's small, thin and not too sticky. You don't have to worry about it pulling up your paper when you remove it. YAY! 
Blooming Daisy Stencil | 
ST-502
Wild Daisy Stencil | ST-503

RB Mini Masking Tape
RB Artiste™ Stenciler 


With the RB Artiste™ Stenciler I applied acrylic paint to the silhouette. This is a beautiful brush.
Our brushes produce exceptionally crisp lines down to the finest detail. This is possible due to our unique feather-touch tips that are pure natural bristle. Our RB Artiste™ Stenciler has a short, contoured wood handle with a satin finish that offers a velvety feel.
I've used this brush with several applications now and find that its "feather-touch" is awesome with both ink and paint. I've used it for removing the delicate gilded bits when doing gilding with the adhesive. I need more of these in my life! It works perfectly with Rebecca Baer's detailed stencils. 


To complete my little book I added the sentiment stamp :Kindness is always in Season! I love these stamps. They are red rubber on foam cling and have beautiful crisp lines. You can use them with your acrylic blocks, or like I did on the video below use an acrylic ruler. I stamped the sentiment in brown which complimented my beautiful papers and stenciling perfectly.
Kindness In Season Stamp
The video below shows the preparation and assembly of the book and will be available as soon as it all uploads into the view! [I apologize--severe spring weather sometimes interferes with best laid plans]. I hope you enjoy my project! All supplies mentioned are available at the link below! Thank you for stopping by! Be sure to check out posts from my teammates each Tuesday and Thursday!

 shopping

Twitter at @leslierahye | Facebook at leslierahye.| YouTube at leslierahye | Pinterest at leslierahye

Wednesday, April 1, 2015

Rebecca Baer Design Team | An Introduction

This article can be found HERE.

Thursday, October 16, 2014

31 Days of Halloween | Day 16 and a bit of a personal story

During the month of October I am participating in a month-long blog hop with some amazing artists. Everyday you will find a new Halloween project on all of the blogs listed below. Each project must have stamping on it, be it digi or ink. There are prizes to win, be sure to check out all the rules HERE and information on the daily scavenger hunt is posted there! You must go HERE to find the item/s you are looking for the scavenger hunt.

If you are looking for my Delightful Challenge Post it is here.


Welcome to Day 16 of the 31 Days of Halloween hop with SmearedInk.com! Happy Thursday everyone--warning this post is an overshare and might not be suitable for everyone...that's okay, I understand. Just look at the tile and read no further. I promise, I will not share a valued technique today. This is a personal story and rather the madness behind the tile.
Today I was "scheduled" to do a tag but I changed my mind. Let me tell you why and what's behind this strange tile. I am having a biopsy today for my thyroid...let's back up. Before my daughter turned 2 (she is now 8), I was diagnosed with Thyroid disease...I had Hypothyroidism--think thyroid in hyperdrive to produce--not making enough. As a condition of this you sometimes have a swollen thyroid, sometimes you get goiters [think lumpy balls] in your thyroid. When I was first diagnosed I was diligent in taking my medicine--not. The only daily pill I had been on ever was a birth control pill and it had been a good 9 years since I had taken one of those. I did not want to take a daily pill. I was not good at remembering. After a few years of attempting to remember my medication I just finally gave up and went into a 6 year period of denial where I did not take it and I did not go to the doctor--EVER.
After a difficult year medically with my son and my husband, I had promised my health would take center focus...if only I knew then.... So I started this journey with the new year--my word was THRIVE, right? I was going to THRIVE in every aspect of my life. A checkup led to more invasive doctors visits....a diagnosis of high blood pressure--score 2 pills--a diagnosis of diabetes--score a pill and a lifestyle adjustment--a diagnosis of hypothyroidism--score that stupid little pill I didn't want to take to start with and more invasive tests.
This summer I went through a horrifying sonogram with a crazy technician that had me convinced I had thyroid cancer. She was inappropriate and we hope wrong...we will know shortly. I got sent to a specialist last month to discuss "the next step." That is what we're calling the biopsy..."the next step." Basically this is to prove without a doubt that there is no cancer but rather some benign gunk in my thyroid in little goiters that can stay in me as long as they do not become a problem with my swallowing, breathing, etc. While I have tried the denial of stress thing for the last few months, those close to me know that this is killing me inside. This is evidenced by the explosion of fever blisters across my lips today [written Wednesday].
So Wednesday night before my biopsy, as I looked at my cut tag and thought of what I wanted to add, I kept thinking how frightened I was of not knowing, how the doctor would be poking me with various skinny long needles and making slides of the goo that she pulled out...I really felt like I would look like Dr. Frankenstein's Monster as I laid there while the doctor held her sono-wand in one hand going from lump to lump and sticking needles in my neck. So as I worried and relieved some stress, I misted and stenciled and stamped and embossed and ended up with my Frankenstein's Monster Tile. There you go...the method to today's madness.  I hope you enjoy my project! Please come back tomorrow for more!


 photo WickedBloggerbutton_zpsbcaacb28.jpg
Smeared Ink Wicked Bloggers 2014
Julia | Lisa | Teresa | Keren | Renee | Alison
Steph | Sandy | Sarah | Stefanie | Barbara

Twitter at @leslierahye | Facebook at leslierahye.| YouTube at leslierahye | Pinterest at leslierahye

Thursday, October 2, 2014

31 Days of Halloween | Day 2

During the month of October I am participating in a month-long blog hop with some amazing artists. Everyday you will find a new Halloween project on all of the blogs listed below. Each project must have stamping on it, be it digi or ink. There are prizes to win, be sure to check out all the rules HERE and information on the daily scavenger hunt is posted there! You must go HERE to find the item/s you are looking for the scavenger hunt.

If you are looking for my Delightful Challenges Post please look here.


Welcome to Day 2 of the 31 Days of Halloween hop with SmearedInk.com! Today my Tag Thursday project starts on a base of Authentique Paper and has a layer of Embossing paste smooshed through a Tim Holtz stencil. I then spritzed with a mist of Dylusians ink and swirled on some brushed corduroy. Next I stamped a Halloween ad background stamp on some white cardstock with the same brown ink and added a witchy crow in Memento black highlighted with some orange marker. An orange bow and citrus green sequins and a bit of die cut border in black finish off this short tag!  I hope you enjoy my tag! Please join me again tomorrow!


 photo WickedBloggerbutton_zpsbcaacb28.jpg
Smeared Ink Wicked Bloggers 2014
Julia | Lisa | Teresa | Keren | Renee | Alison
Steph | Sandy | Sarah | Stefanie | Barbara


Twitter at @leslierahye | Facebook at leslierahye.| YouTube at leslierahye | Pinterest at leslierahye

Sunday, April 6, 2014

Impossible Things

This article can be read HERE.

Friday, November 22, 2013

You are my Best Friend!


Hi everyone! I'm sharing a fun fat book page on the AlteredPages.com Art-Sociates Blog today featuring some new items in the store! I hope you enjoy!

Materials :
G45 Steampunk Spells
Liquitex Modeling Paste
Ranger Distress Glitter Clear Rock Candy
Foam Tape
Burlap String
markers

Begin by adhering some pattern paper to a 4×4 cardboard square. With Modeling Paste stencil 2 sides of the square with a Dylusions stencil. I then poured microbeads from my Ephemera Treasureson the wet paste. The microbeads stay in place with the paste. Once dry edge the sides with Mix'd Media Inx Truffles.

Stamp a new Altered Pages rubber stamp with Mix's Media Inx Black onto cork paper. Color with Sharpie Metallic and Brown Markers. Add glue to "sand" of the hour glass and dust Distress Glitter. Sand the edges of the Glitz card stock stickers and ink. Layer on the fat book with foam tape.
Giant Rhinestone and bling as well as a burlap string wrapping finish the fat book!

Thank you for stopping by!

Twitter at @leslierahye | Facebook at leslierahye.| YouTube at leslierahye | Pinterest at leslierahye