Showing posts with label mini album. Show all posts

Thursday, April 9, 2015

The Season of Kindness Field Book


Lace Tile - Product Image
Omni Board Lace Tile
Good morning! Today I'm sharing my first official post with Rebecca Baer­® Inc. I have created a field book with the Omni Board Lace Tile. I love making little books and saw this tile and knew it would be covers of a book! A field book is something that you can take with you--you know, out in the field. I filled this one with blank pages and pocket pages using my Bind-it-all so that I could take notes, or doodle, or collect leaves and flowers. This is one of my favorite parts of the year and this will fit nicely in my backpack! The Omni Board comes in several shapes and sizes and is an awesome surface. It's lightweight, paintable, sandable, excellent for Mixed Media!

Painted Digital Papers | Cafe - Product Image
Painted Digital Papers | Cafe
I prepared my tile for covering with Rebecca Baer­® Painted Digital Papers by applying 2 thin layers of Gilded Stenciling Adhesive. I let them dry to clear both times and then layed the paper over the tile and secured with my brayer. I next cut around the tile with a craft knife and traced inside the lace pieces to get the paper out of the curvy pieces. This process can be tedious. I use little pieces of sand paper and dental tools to help remove excess glue and paper from the lace holes. I sand all edges of the tile and lightly sand over the "lacy" part. Next all edges are inked with brown distress ink.

Rebecca's Painted Digital Papers are gorgeous. I love this Cafe pack. The lighter papers are great to apply stenciling and stamping on top of and the darker colors are so rich and warm...just beautiful. I printed my papers to use for covering the Omni Board on regular weight bright white paper using an HP color laser printer. For the inside pocket pages I used a lightweight bright white card stock.
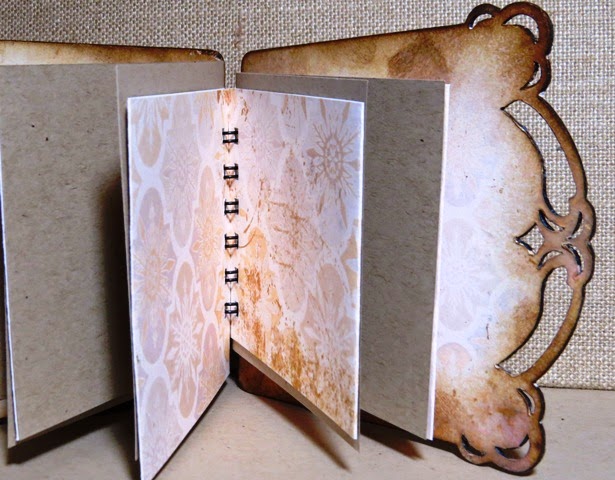

The Omni Board Lace tile comes with 2 pieces and some spacers. There is a square that can be popped up with the spacers on the front of the tile. I prepared the front with sanding and adhered light paper on top as above. 

This time I used the beautiful two-part daisy stencils. The two-part stencil provides you with a silhouette of your image and a detail line of your image. This is great for the doodler in me. I could use just the silhouette and create my own doodles or use the detail stencil for the perfect line or highlights to the flowers. Before stenciling the silhouettes, I position my flowers and the stamp I want to use to see how they will fit on the front tile. When I'm happy with the arrangement I secure my 1st stencil with the RB Mini Masking Tape--I LOVE this little adhesive! It's small, thin and not too sticky. You don't have to worry about it pulling up your paper when you remove it. YAY! 
Blooming Daisy Stencil | 
ST-502
Wild Daisy Stencil | ST-503

RB Mini Masking Tape
RB Artiste™ Stenciler 


With the RB Artiste™ Stenciler I applied acrylic paint to the silhouette. This is a beautiful brush.
Our brushes produce exceptionally crisp lines down to the finest detail. This is possible due to our unique feather-touch tips that are pure natural bristle. Our RB Artiste™ Stenciler has a short, contoured wood handle with a satin finish that offers a velvety feel.
I've used this brush with several applications now and find that its "feather-touch" is awesome with both ink and paint. I've used it for removing the delicate gilded bits when doing gilding with the adhesive. I need more of these in my life! It works perfectly with Rebecca Baer's detailed stencils. 


To complete my little book I added the sentiment stamp :Kindness is always in Season! I love these stamps. They are red rubber on foam cling and have beautiful crisp lines. You can use them with your acrylic blocks, or like I did on the video below use an acrylic ruler. I stamped the sentiment in brown which complimented my beautiful papers and stenciling perfectly.
Kindness In Season Stamp
The video below shows the preparation and assembly of the book and will be available as soon as it all uploads into the view! [I apologize--severe spring weather sometimes interferes with best laid plans]. I hope you enjoy my project! All supplies mentioned are available at the link below! Thank you for stopping by! Be sure to check out posts from my teammates each Tuesday and Thursday!

 shopping

Twitter at @leslierahye | Facebook at leslierahye.| YouTube at leslierahye | Pinterest at leslierahye

Sunday, September 2, 2012

Collage Stamped Mini with Viva Las Vegastamps!


 Happy Labor Day! Today on the Viva Las Vegastamps! Blog I share with you a technique for creating a stamped collage Mini Album. This album was hand crafted using Viva Las Vegastamps! and Distressed Inks to create a background similar to the Graphic45 paper that I used on the cover of the album. With the amazing variety of Viva Las Vegastamps! images I can make as many papers as I need and have my entire album coordinate from front to back.

I begin this tutorial focusing on the inside cover pages of the book. When I made this album I began with Graphic45 paper from the Olde Curiosity Shoppe Collection but wanted to incorporate some of the fabulous new stamps from the most recent release and some of my favorites in the store that are similar in style and theme as the Genuine Article page. This would become the inside front cover of my mini and allow me to create interior pages that will match!!

The Method


An interior page stamped with both Antique Linen
& Walnut Stain 
The cover of the mini with the Graphic 45 paper...
I think they work well together, don't you?


Wednesday, August 29, 2012

Pencil Bound Mini Album with Digital Delights by Louby Loo


Today on the Digital Delights blog I have a tutorial for a Back-to-School Mini Album with papers and
pre-colored digital stamps by  Digital Delights
I hope you enjoy my tutorial!


Check out the how-to video on our Tutorial Blog
Thank you for joining me! 

Wednesday, August 8, 2012

Summer Milestones Mini Album with Prima Live!!!

If you don't subscribe to the Prima Live newsletter, or even if you do, I want to share some exciting news with you!!! The fabulous Cari Fennel, Endorsed Prima Educator and Coordinator of Live with Prima, invited me to guest demo for them TOMORROW!!! I'm very excited at this awesome opportunity and hope my fans can join me Thursday August 9th, 8:30 p.m. CST/9:30 p.m. EST
I will be featuring the new Craftsman Collection and making a Summer Milestones Mini--steampunk style!


See you tomorrow! Can't stop smiling!!! 

Saturday, June 16, 2012

Chunky Coaster Mini

Saturday, April 21, 2012

Nicolette's Mother's Day Blog Hop | Day 1

Welcome to Nicolette's Mom's Day Blog Hop! This is a two-day blog hop from Hostess Nicolette. You can start back at the top of the hop at Nicolette's blog Beyond Scrapin'. If you came from Cheryl's blog you are in the right place! 

 For today I made a Hand Painted Hand Crafted Mini Book[2×2"]. Both the cover and the inside pages were hand painted using watercolor crayons. The flowers on the front were also hand painted using matching colors. The ribbon serves as a closure for the album. This album is left blank to serve as a decorative gift for my mother...she could use this little book to tuck away passwords or meditations or any personal notes for safe keeping. The petite size of this mini makes it perfect for such secret actions. Thank you for looking! I hope you enjoy my project.

The next stop on the hop is Robin's blog! Hop on over and check out her project!

The Lineup

Tuesday, March 6, 2012

It's all about ME | Viva Las VegaStamps! DT ApplicationCover

Today I am bringing you this fun upcycled project using materials that most would toss into the trash. Many of you know my love for upcycled crafts and this project reflects that as well as my love of rubber stamping. Today I am trying out for the design team to the amazing company Viva Las VegaStamps! I am a new fan of VLVS and *most* of my stamps are of the seasonal variety--which you have seen me using on my Festive Friday's posts. For today's project I wanted to show off some fun and easy techniques while sharing a bit about myself.
Cover is a round coaster painted with acrylic paint and embossed using
Sizzix Tim Holrz Texture Fades. A thin layer of Sakura 3D Crystal Lacquer
and Terri Sproul's Mixers in Aquamarine Pearl and Pink Sapphire Pearl was
added and then a definition background  was stamped over the top using
Stewart Superior India Ink in Black. Cover embellishments include teal
feathers, a handmade ribbon ruffle flower [also stamped] and the title
piece stamped on upcycled packing material.
The reverse side of the embossed coaster was painted black
and then a thin layer of lacquer with the Violet Pearl interference
was added. The statement on this page was also stamped on
upcycled packing material. Embellishments on this page include
hand stamped flower petals and feathers and a pre-made butterfly.
The base of this page is a piece of upcycled packaging
covered in the upcycled packing paper. The surface was stamped
with both definition backgrounds and gears. The quote was stamped
on a separate piece of packing and attached with Mod Podge.
edges were inked and hand-stamped flower embellishments
with feathers and bells were added.
The back side of the upcycled packaging received layers of UTEE
and a couple of layers with Aquamarine Pearl from Terri Sproul's Mixers.
Transparency butterflies were embedded in the UTEE, a texture stamp was
pressed into the wet UTEE to add dimension. The "friend"definition
was again stamped on upcycled packing material and added to the UTEE
coated page with Mod Podge. The feather "flower" was also included
in the embellishments on the page as well as another pre-made butterfly.
In this detail, the cracked cooled UTEE
and the textured UTEE as well as the
swirles of Mixers in the UTEE can be
observed.
This next page is an upcycled toilet paper tube and a upcycled
stained [with Terri Sproul's Mixers from a previous project]
Paper Towel! The Paper Towel was adhered to the Roll with Mod
Podge and then stamped with India ink and edged with Walnut
Stain Ink. The quote was stamped on upcycled packing material
and a ribbon was added to the front as an embellishment.
The reverse side of the Upcycled toilet paper roll was directly
stamped with a fun quote and textured sprocket stamps. The
embellishment on this page includes teal feathers and a knotted
organza ribbon.
The final page is created from a rectangle-shaped coaster
and covered on this side with upcycled packing material.
The surface was dusted on still wet Mod Podge with
Aquamarine Terri Sproul's mixers and Violet Pearl Interference
The gears were stamped with Stewart Superior India Ink.
The glass embellishment was stamped with India Ink, and embossed
with clear Embossing Powder to set the sentiment to the glass.
The slide was attached to the page with Sakura 3D Crystal
Lacquer. 
The back side of the coaster was covered with some left-over
wall paper that a teammate sent to me! I colored the wall paper
with Terri Sprouls Mixers , water and Gum Arabic--a binding
agent. I love using the Mixers as water colors.
The end of the page was embellished with beaded trims and braids.

Thank you for stopping by! I hope you enjoyed my album and will leave me some love. I hope some folks in the west find this project to their liking and give me the opportunity to present more techniques using their amazing red rubber stamps and miracle tape--something that I am POSITIVE I need in my life. VLVS has thousands upon thousands of rubber stamps in as many topics! What a fantastic company! 


Wednesday, March 16, 2011

Come2Chat Craft Challenge | Upcycled Spring Toilet Paper Rolls

Come2Chat is a live interactive chat time at Creative EdVentures where guests can chat live with artists working in their studies and share ideas, ask questions, show what they're working on or just chat about fun stuff. It's weekly Monday Wendnesday Friday at 11:00 a.m. CST
With March being Craft Month, Come2Chat decided to kick the fun up a notch with a weekly craft challenge. The first challenge was as follows:

Our first Challenge is : Upcycled Spring with Toilet Paper Rolls
Challenge due date :  14 March 2011
The Rules :
1. The object needs to be UPCYCLED. Upcycled "the practice of converting waste materials into products of greater value, is a philosophy that transforms the way we conceive of waste"
A great article about upcycling can be found here: http://www.digitaluniverse.net/upcycling/

2. The object needs to include TOILET PAPER ROLLS or some other cardboard tube--wrapping paper, paper towels, aluminum foil core.

3. The theme of the crafty is SPRING. I know with 2 kids in school and everything abloom outside our house has MAJOR spring fever...show us your Spring Thing!

4. HAVE FUN BEING CRAFTY!

The following is my contribution to Upcycled Spring Toilet Paper Rolls. I hope you enjoy!


Next weeks challenge is a Cardboard Classic. Details can be found on the Come2Chat group in Facebook.
Are you up for the challenge!?!? Get Crafty!

Saturday, January 22, 2011

KinderStampO's 34 Birthday Balloons and Counting Blog Hop

Hi everyone and Welcome to KinderStampO's 34 Birthday Candles and Counting Blog Hop. Today we have over 40 designers sharing atleast 40 fun birthday inspired projects too. If you arrive from Krista's Paper Cafe then you are in the right place. If you are just here visiting and want to start from the top click here


For Jessicas 34th birthday, I wanted to make her something special that could commemorate her special day and provide her with a space to write and document her thoughts on this occassion. I created a mixed mini album using diecut chipboard, coasters, and upcycled toilet paper rolls as the base. I assembled these items with my Bind-It-All, used beautiful Coordinations and Basic Grey papers, and included quotes that I specially formatted for everyone to download for personal use only. This book incorporated some of Jess's favorite elements including butterflies, chipboard, and the color brown! I hope you enjoy it Jess as much as I enjoyed creating.


I will be giving away a kit on Monday 24 January 2011 to do this very project yourself in honor of Jessica's birthday! To enter to win, follow my blog [either by selecting to follow my blog through the google button on the right, or through networked blogs on facebook] AND by leaving a comment below!

Thank you for looking! The next stop is PSA Stamp Company

List of Blog stops along the way: