Showing posts with label bind-it-all. Show all posts

Thursday, April 9, 2015

The Season of Kindness Field Book


Lace Tile - Product Image
Omni Board Lace Tile
Good morning! Today I'm sharing my first official post with Rebecca Baer­® Inc. I have created a field book with the Omni Board Lace Tile. I love making little books and saw this tile and knew it would be covers of a book! A field book is something that you can take with you--you know, out in the field. I filled this one with blank pages and pocket pages using my Bind-it-all so that I could take notes, or doodle, or collect leaves and flowers. This is one of my favorite parts of the year and this will fit nicely in my backpack! The Omni Board comes in several shapes and sizes and is an awesome surface. It's lightweight, paintable, sandable, excellent for Mixed Media!

Painted Digital Papers | Cafe - Product Image
Painted Digital Papers | Cafe
I prepared my tile for covering with Rebecca Baer­® Painted Digital Papers by applying 2 thin layers of Gilded Stenciling Adhesive. I let them dry to clear both times and then layed the paper over the tile and secured with my brayer. I next cut around the tile with a craft knife and traced inside the lace pieces to get the paper out of the curvy pieces. This process can be tedious. I use little pieces of sand paper and dental tools to help remove excess glue and paper from the lace holes. I sand all edges of the tile and lightly sand over the "lacy" part. Next all edges are inked with brown distress ink.

Rebecca's Painted Digital Papers are gorgeous. I love this Cafe pack. The lighter papers are great to apply stenciling and stamping on top of and the darker colors are so rich and warm...just beautiful. I printed my papers to use for covering the Omni Board on regular weight bright white paper using an HP color laser printer. For the inside pocket pages I used a lightweight bright white card stock.
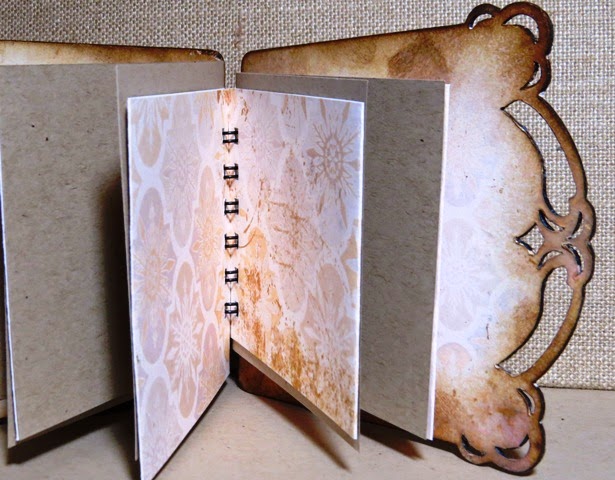

The Omni Board Lace tile comes with 2 pieces and some spacers. There is a square that can be popped up with the spacers on the front of the tile. I prepared the front with sanding and adhered light paper on top as above. 

This time I used the beautiful two-part daisy stencils. The two-part stencil provides you with a silhouette of your image and a detail line of your image. This is great for the doodler in me. I could use just the silhouette and create my own doodles or use the detail stencil for the perfect line or highlights to the flowers. Before stenciling the silhouettes, I position my flowers and the stamp I want to use to see how they will fit on the front tile. When I'm happy with the arrangement I secure my 1st stencil with the RB Mini Masking Tape--I LOVE this little adhesive! It's small, thin and not too sticky. You don't have to worry about it pulling up your paper when you remove it. YAY! 
Blooming Daisy Stencil | 
ST-502
Wild Daisy Stencil | ST-503

RB Mini Masking Tape
RB Artiste™ Stenciler 


With the RB Artiste™ Stenciler I applied acrylic paint to the silhouette. This is a beautiful brush.
Our brushes produce exceptionally crisp lines down to the finest detail. This is possible due to our unique feather-touch tips that are pure natural bristle. Our RB Artiste™ Stenciler has a short, contoured wood handle with a satin finish that offers a velvety feel.
I've used this brush with several applications now and find that its "feather-touch" is awesome with both ink and paint. I've used it for removing the delicate gilded bits when doing gilding with the adhesive. I need more of these in my life! It works perfectly with Rebecca Baer's detailed stencils. 


To complete my little book I added the sentiment stamp :Kindness is always in Season! I love these stamps. They are red rubber on foam cling and have beautiful crisp lines. You can use them with your acrylic blocks, or like I did on the video below use an acrylic ruler. I stamped the sentiment in brown which complimented my beautiful papers and stenciling perfectly.
Kindness In Season Stamp
The video below shows the preparation and assembly of the book and will be available as soon as it all uploads into the view! [I apologize--severe spring weather sometimes interferes with best laid plans]. I hope you enjoy my project! All supplies mentioned are available at the link below! Thank you for stopping by! Be sure to check out posts from my teammates each Tuesday and Thursday!

 shopping

Twitter at @leslierahye | Facebook at leslierahye.| YouTube at leslierahye | Pinterest at leslierahye

Tuesday, January 31, 2012

Love Cast in Clay Blog Hop | Molded Love Notes Notepads

Thanks for joining this amazing group of blogs.  This is two Design teams using both Amazing Mold Putty and Creative Paperclay® to create amazing project for you

I began by punching the holes of my love notes cover
with my Bind-it-all. The finished cover will not fit into
Bind-it-All that I have so the holes will mold and
allow me to cut them with a craft knife later.
I then wrote "love notes" on the cover .
To make the yarn easier to manipulate, I applied glue
to the enter length of yarn and on the letters. I then
lined up the yarn starting with the "l". When I got to the
end of the "e", I brought the yard around the perimeter
of the 4×2½" cover, making the heart by looping
the yarn.
I completed the word "notes"  and added glue to
areas of the cover that appeared to be lifting. I
set the cover aside to dry completely before
attempting to mold it.

 
I conditioned equal parts of Amazing Mold Putty part A and
part B. I worked quickly to cover the note pad cover and used
my brayer to smooth the back of the mold so if I later wanted
to cast the cover with Amazing Clear Cast or Amazing Casting
Resin it would make for an even pour.  I sat the mold aside to cure.
Once cured I removed the original to inspect my mold. I loved it.
Experiments led me to use the Creative Paperclay Delight. The
Delight is super light and makes an incredible impression in the
mold. it dries super quick--a process which can be sped up in
a warm oven. I made sure to brayer my Delight in the mold to
have a smooth back for my cover.
I un-molded my Delight cover in white. Pleased with the results
I next added a touch of pink pant to the delight and molded a
pink cover as well. Once the molded pieced dried, I trimmed off
the edges of the cover and used a craft knife to cut the holes to
bind my cover to the base of the book.
When painting the Delight, I used Sakura 3D Crystal lacquer
mixed with Alumilite Gold Metallic Powder--which melts so pretty
in the lacquer, and Terri Sproul's Mixers in Red Satin to high-
light the yarn words. I lightly brushed the gold in a transparent
layer on the face of the cover and in a more opaque manner
around the edges.
Once dry I stacked the cover, the punched inner pages, and the
backing board in the order as it should look once bound.
I then flipped the back board over on the front of the cover
and threaded the wires into the cover so that the "u" rested
inside the back cover. I crimped my coil in my Bind-it-All
to create my Love Notes Notebook. I added Crafty Ribbons
Ribbon from the Ladybug bargain bag to the coils.
I hope you enjoyed my Molded Love Notes tutorial! Thank you for looking!
Enjoy the rest of the hop! Be sure to leave a comment and
become a follower if you are not already.  The blog roll below will keep you on track!

Saturday, October 22, 2011

Nicolette's Fall & Halloween Blog Hop | Day 2 MORE Mummies!!


Welcome to Day 2 of Nicolette's Fall & Halloween Blog Hop! I am so excited to be a part of this fun blog hop with these amazing ladies. As I am the second stop on the hop, you should have come from Nicollete's Blog Beyond Scrappin. If you just happened upon my blog, you may start at the beginning at Nicolette's blog here
Fall & Halloween Blog Hop
Remember yesterday when I said, "This year I can't seem to get enough of mummies." It's true...I think every rectangle in my house is going to be turned into a mummy! Today's project is another that I'm finishing up for my daughter's class. This year they are not having a party at school but rather are collecting items for a Halloween goodie bag. I always like to make something non-edible for these. This year, since drawing is probably my daughter's favorite thing to do I made little drawing notepads.
For this project you will need:
all supplies available through http://www.cutnpastememories.com
small black rectangle of card stock
Google eyes and glue
2 pieces of Bazzill Book Board 2½×4"
4 pieces of 8½×½" white Bazzill card stock
Old Paper Distress Ink by Ranger
distressing tool
Bind-it-All and wire

Cut Bazzill card stock into ½" strips and distress.

 Ink distressed strips by lightly running Old Paper Distress Ink over the top of one side of strip.
Glue a piece of black card stock to one piece of Bazzill Board. Glue on Google Eyes.

 Add strips building up around eyes first to get that area to look like the eyes are behind the "gauze."
 Add strips until the whole surface is covered. Trim the edges and rub Old Paper Distress Ink over edges.
 With the Bind-it-All, cut holes in the cover and in the back board. Cut holes in the filler paper--I used 35 pieces of white paper as filler for these little notepads.
 Add the wire top to the notebook. To add this correctly, stack your notebook as it should appear correctly. Then flip the back cover over to the front cover and add wire so that the side with the in-between wires is along the back cover. Crimp the wire closed with the Bind-it-all and flip the back cover back to the back!

As a reminder you can catch my LIVE bi-monthly show leslierahye's crafty gig on the 2nd and 4th Friday's of the month! Hope to see you in my crowd!

Now for the next stop on the hop, stop by Michelle's blog Peanut Butter and Jelly Designs and see what fun ideas she has to share!

Wednesday, August 10, 2011

Gift Card Holder and Sakura Hobby Craft Crystal Lacquer


As many of you know I'm hand-making the holiday gifts that come from my family this year. While it is my goal to give everyone a hand-made item, there is one category of recipients that might get a gift card or two for their holiday gift--the teachers. We usually bring homemade goodies for the teachers--truffles, candies, apple dip. When we can swing it we try to get them a gift card as well, either to a favorite store or to Staples or the local teacher store as we all know the teachers buy out of their pockets to supplement what the school and state cannot provide.

Rather than a plain card with the gift card(s) stuck inside, I think the up-cycled toilet paper tube mini should be made over to become a handy gift card holder! It IS the perfect size for the credit card size gift cards and for places with gift certificates, the pockets could easily accommodate any folded piece of paper.

Back-to-School Gift Card Holder


Ingredients:
2 toilet paper tubes flattened
something to "bind" your 2 tubes together--I used the bind-it-all.
cardstock/patterned paper to match your occassion
[I used primary colors here as I wanted to use my sample for a back-to-school gift for my child's kindergarten teacher--hence the "k" on the cover]
quotes--formatted and printed on printer.
Sakura Hobby Craft 3D Crystal Lacquer
assorted embellishments [ribbon, butterflies, flowers, bling, buttons, brads, yarn, and bottle caps]
Marvey Inks and Ranger Stains
Beacon 3-in-1 craft glue &; 3D glue dots


Creating the gift card holder is very easy! Cover the toilet paper tubes with cardstock and a strip of patterned paper. once covered, take a moment to even up the tubes --all toilet paper tubes are not created equally! Mat the various quotes or edge with coordinating ink for mock-edging to add a bit of dimension to the quotes. Place a quote or two on the inside "pages" or provide a blank mat to leave a message for your teacher.


The star of the fun dimensional cover is Sakura Hobby Craft 3D Crystal Lacquer. For this cover I used it 3 different ways--2 you perhaps are familiar with and one is a fun technique I discovered about a year ago while creating my samples for a tag class that I was teaching!


After punching letters out of some cardstock that had these great alphabets, I edged the paper with ink and then applied Sakura 3D Crystal Lacquer to the letters themselves for added dimension. What makes Sakura 3D Crystal Lacquer different from the regular lacquers is that it has a heavier body. What that means to you is that you can get DIMENSION on the items you lacquer...it flows nicely but is just enough thicker that you can actually SEE the lacquer sitting on top of the paper!


I punched out a letter "k" for kindergarten and matted it with some red cardstock and housed it in a bottle cap for a handmade embellishment. The Sakura 3D lacquer served as the glue for the paper and as the "glass-like" cover over the letter--giving it the effect of those dome-covered embellishments without needing a separate "dome".


The final embellishment that I created with the Sakura 3D lacquer is made with 4 simple ingredients: Sakura 3D lacquer, glitter, cardboard and ink--to color the cardboard's edges [for that finished look]. I inked the edges of the cardboard--let it dry. I applied the Sakura 3D lacquer to the entire cover of my cardboard shape--an apple. While it was wet, I sprinkled glitter until it was fully covered--and then I zapped it with the heat gun! That's right...don't wait. When you heat the Sakura 3D lacquer, you can see it start to MOVE and then it brings a whole new meaning to 3D!!! Your piece will PUFF UP. You can play with it carefully--being sure not to over puff, as it will pop--backing of gently to see if the lacquer is now drying and holding the shape. When you are happy with the shape of the piece, stop. You can either let it dry and attach it--it will be more glittery--or you can add an additional layer of lacquer for that shinier finish as seen here. It's really a lot of fun creating your 3D puffed embellishment!!


To finish off your gift, you need to make some tags for the tubes. With coordinating cardstock and patterned paper, create the folded tags for the tube pockets by folding a piece of 2½×8" cardstock and adding a folded piece of patterned paper trimmed to 2×7½". Attach a ribbon to the folded end with a brad. The tags can be finished out with paper flowers and buttons, and wired butterflies. A gift card can be attached inside a pocket with a glue dot. A special note from your child could be tucked into the other tag or another gift card!

Finally attach fibers, fabric or ribbons to the binding to jazz it up a bit! I try to use leftovers from other projects to save cost and have that satisfaction of reusing, reducing and recycling!

Thank you for stopping by! I hope you enjoyed my project. I really hope someone in LA is saying "WOW!"


To enjoy other projects made with Sakura 3D Crystal Lacquer and other Sakura Hobby Craft products, check out their blog!!

Tuesday, April 12, 2011

Throwback Tuesday | Sam's Fairy Party Part I

For my daughter's birthday, she wanted a Fairy Birthday Party. She has always been fascinated by the fanciful and loves all things wings.  Her brother wanted to play a huge role in the making of the party items and invitation and I loved collaborating with him on this project. A lot of  detail went into the planning of this party to make it a spectacular fairy wonderland. In order to focus on all the details, I've divided this post into 3 parts--the first part today covers the invitation, general guest preparation and the cake. Part 2 will cover the decorations and fairy environment. Part 3 will include a tutorial on wing construction.

For her invitation, Will and I illustrated a Fairy Story  inviting folks to come to the secret location of the fairies.
title page of book
 We began by making individual illustrations of the various fanciful creatures that would be in fairy books. I did some of the watercolor drawings and Will did others. We merged them together to form the illustrations of the book.
opening of book featuring art from Will and myself
 Once the illustrations were merged, the book was designed in Publisher and written about Samantha and the party. The book was bound using the Bind-it-All with pink coils. the covers of the book were bookboard covered with pretty paper.
another page of book featuring Will primarily
additional characters featured on other pages in the book
Fairy wings were made for each party-goer out of acetate, alcohol inks, tissue paper, paint and glitter. A tutorial for the process of making the wings will be in the 3 part of this post.
The guests faces were painted when they arrived using Crayola watercolor paint and soft bristle brushes..

Sam and Will outfitted with their wings and faces painted
 The cake was a two layer round strawberry cake with buttercream icing, embellished with fresh flowers and green icing! YUM!

The backyard was transformed into a fairy paradise...below is a hint of what is to come in Part 2--Fairy Sam is relaxed eating mini marshmallows at a fairy feeding station...several of these were positioned around the yard to attract fairies to the area!
A great time was had by all...look for more on the fairy party on another Throwback Tuesday!


Thank you for visiting I hope you like what you see!