Showing posts with label mists. Show all posts

Thursday, June 18, 2015

Delightful Thursday

It's Delightful Thursday and the Digital Delights design team is sharing inspiration on the Digital Delights Blog today! 

GOOD Morning! Today's card from Digital Delights I created this fun gate-fold scene with precolored images from Digital Delights. I love Ready for Battle Sparky and Cowardly George! They are so cute. I brushed on sparkly perfect pearl mists on the armor and castle. On the castle background and the gates I brushed on watered down dylusions mists to create a wash for the sky and grass. I scored a thin strip on the side to fold neatly and adhered it to the edges of my card so that each side opens. Little notes can be written on the reverse side of Sparky and George! The whole scene was matted on some blue and then onto a heavy base card square. I hope you enjoy my project!
Castle
Ready for battle Sparky
Paper: Bazzill
Accessories: Foam Tape, dylusions mists, perfect pearls mists

Thank you for stopping by!
Be sure to check out the rest of the team !


Twitter at @leslierahye | Facebook at leslierahye.| YouTube at leslierahye | Pinterest at leslierahye

Thursday, June 11, 2015

Prejudice is a burden art journal page with Rebecca Baer®

Good Morning! Today I've created a journal page using Rebecca Baer™ Stencils and brushes. Rebecca's small stencils are perfect for art journaling and her brushes are a dream to work with.


For this project I began by laying down a thin coat of gesso on my mixed media paper so that my inks and colors rest on top of the surface rather than absorbing down into the paper. This way use less product to achieve the deep colors I love.  Using a wide brush in the RB Classique™ Angles set, I brushed thinly and quickly but completely to get a full coverage.
RB Classique(TM) Angles - Product Image

Next I applied watercolor crayons to the surface with no particular pattern in mind. You will see below that once water is applied and the colors are all blended it looks NOTHING like the pattern. I used the RB Classique™ Angles brush to get a smooth blend of the colors.


Next I grabbed my Mixed Elements Honey Comb Small Stencil [I just can't get enough of this stencil]  and began layering mists on the background I had created. For this technique I applied a LOT of mist in some areas and dried it with my heat tool to create those darker pools of ink.
Honeycomb Stencil - Product Image


For this journal page I will share a quote and only need a single element to the side that enhanced my page. I love this Blooming Daisy Stencil| ST-502 in the medium size for this project. It's almost the full size of the page and it complements well with the whole natural feel of the Mixed Elements Honey Comb stencil that I've used. Using gesso I painted several layers through the solid part of the stencil to provide a lighter area to paint over the sunflower so that it will pop rather just blend in. There is so much ink on this page that the wet of the gesso mixes with and activates the mist below making the gesso appear blue green! 

Blooming Daisy Stencil | ST-502 - Product Image

Next I layer on acrylic paint to color the daisy to look like a sunflower using the small brushes in the RB Classique™ Angles set. 

Using the tip of the brush I added little "seeds" to my center.

Using the detail portion of the Blooming Daisy Stencil I misted a copper sparkly color, blotted it and then went back with a white mist...you can just see a hint of the details. I printed off my quote, misted it lightly with the colors I had used, cut it apart and adhered it to the page. 

Finally to add some pop to the colors I went around the words with a white paint pen and a Payne's grey brush pen. I added Payne's grey to the edges of the Daisy as well to help it pop! 

I hope you enjoyed my art journal page today! All supplies mentioned are available In Rebecca Baer's® store at the link below! Thank you for stopping by! Be sure to check out posts from my teammates each Tuesday and Thursday!


Twitter at @leslierahye | Facebook at leslierahye.| YouTube at leslierahye | Pinterest at leslierahye | Instagram at leslierahye


Friday, January 9, 2015

New Release with Cheery Lynn!!!

 Happy Friday everyone! Today on the Cheery Lynn Blog it's NEW RELEASE day!!! We have an amazing new release that's being unveiled at CHA 2015 in Anaheim, California starting today through the 13th! Be sure to hop over and check out the complete New Release! There are some fabulous samples from my teamies on the blog! 


New Dies Used :

Thank you for stopping by! I hope you enjoyed my projects!


*****
Remember there is still time to join the new challenge!!! Challenge #166 is Winter Whites There is a chance to win a $20 shopping spree at Cheery Lynn Designs. Thank you for stopping by today!
Twitter at @leslierahye | Facebook at leslierahye.| YouTube at leslierahye | Pinterest at leslierahye

Tuesday, December 2, 2014

Winter Greetings


Happy Tuesday everyone! On the Cheery Lynn Blog today I share a seasonal holiday card using some of my favorite elements! Even though I  live in a VERY WARM state, snowflakes are one of my favorite design elements for winter. For this card I used the Snowflake Wonder Doily  along with Snowflowers sets and the Snowflakes plate. The elegant Fancy Deer paired with some shiny florals and bling. Below is a brief tutorial with all the tips.


Begin by cutting the Snowflake Wonder Doily without the center die out of Kraft and mist with an opaque white mist. I masked the center of the doily with a square. 

Once I was happy with the look of the outer of the doily, I misted lightly from high so that it looked like a light misting of snow.

I then returned my mask to the doily to mist with a blue-hued mica mist. I heat set this mist to hold the colors in place.

I placed a red square behind the doily to coordinate with the red flowers that will be placed on the card and to help the doily to pop off the card. I then layered on snowflakes and a Fancy Deer with antlers--to add extra sparkle the white pieces were misted with a Pearl white mist. This focal square was place on the top two-thirds of the card.

I then began layering my florals on top of the mini flourish band. I built the flowers and added beads to the centers with a clear lacquer. The petals of the leaves and flowers were also painted with the lacquer to add shine [see last photo for the full effect]

Bling was added to several snowflake centers to add more sparkle.


  Cheery Lynn Dies used

*****
Remember there is still time to join the new challenge!!! Challenge #161 is Tis the Season There is a chance to win a $20 shopping spree at Cheery Lynn Designs. Thank you for stopping by today!
*****

Twitter at @leslierahye | Facebook at leslierahye.| YouTube at leslierahye | Pinterest at leslierahye

Tuesday, November 25, 2014

Pink Snowflakes!


Happy Tuesday everyone!Today on the Cheery Lynn Blog I am once again playing along with this weeks challenge--Nontraditional Christmas Colors! I love using pink and lime green for holiday decorations. I have been creating these snowflakes for my tree and decided to share one with you.
I began by cutting several white card stock Royal Scandinavian Doilies--with solid centers.

I misted them with pink and Perfect Pearl Mists. I dried them with the heat tool and then fold up my doily...In half both directions perpendicular to the edges of the square. Next I fold the diagonally both directions. I cut to the center from one side and re-creased each fold to look like the doilies below.

 I lined up the doilies so that the corners line up on the top and bottom of my doily. I added a third doily to the back--lining up the top and bottom point.

Finally I cut a snowflake and misted it with Perfect Pearls. I added crystals and glued the snowflake to the top of the folded doilies. A string through the top makes the snowflake able to be hung on the tree.


 Cheery Lynn Dies used
Royal Scandinavian Doily (Set of 2)
Snowflake 2 - DL166

Thank you for stopping by! I hope you enjoyed my project!

*****
Remember there is still time to join the new challenge!!! Challenge #160 is Non Traditional Christmas Colors There is a chance to win a $20 shopping spree at Cheery Lynn Designs. Thank you for stopping by today!

Twitter at @leslierahye | Facebook at leslierahye.| YouTube at leslierahye | Pinterest at leslierahye

Thursday, October 23, 2014

31 Days of Halloween | Day 23

During the month of October I am participating in a month-long blog hop with some amazing artists. Everyday you will find a new Halloween project on all of the blogs listed below. Each project must have stamping on it, be it digi or ink. There are prizes to win, be sure to check out all the rules HERE and information on the daily scavenger hunt is posted there! You must go HERE to find the item/s you are looking for the scavenger hunt.

If you're looking for my Delightful Challenges post, it is here.

Welcome to Day 23 of the 31 Days of Halloween hop with SmearedInk.com! Today I have a bit of news...since I so publicly shared my fears over the biopsy last week, I am pleased t share the news artfully and publicly as well.I got the call from the doctor's assistant today that my results came back and my nodule is benign--or BEE-nign! :)  Yes, I'm pleased beyond words...and relieved...and EXHAUSTED. Worrying is tiresome. So I go back in 6 months to monitor the lumpy lump and see how it goes. Thank you all for your concerns. I appreciate each and everyone of you!
SO...today I use my favorite BEE Afraid digital image pre-colored from Digital Delights by Louby Loo and create another fat book tile announcing my results. To create this tile I printed my bee with sentiment onto transparency with my way-cool color laser printer--have I told you how much I LOVE this printer?!?!? For the "dark night" I used some of the resist Kraft from Tim Holtz's collection and misted black Dylusians and Pewter Perfect Pearls Mist. I dried it completely and then sprayed white to "shadow" my clear image using a mask I had cut from a cardstock image of the same size. When I was happy with the whiteness of my "shadow" I dried the tile again and affixed my clear overlay  to the tile with brads! 

I hope you enjoyed my fat book tile! Please come back tomorrow!!

 photo WickedBloggerbutton_zpsbcaacb28.jpg
Smeared Ink Wicked Bloggers 2014
Julia | Lisa | Teresa | Keren | Renee | Alison
Steph | Sandy | Sarah | Stefanie | Barbara

Coming Soon to a Blog Near You!!!

Twitter at @leslierahye | Facebook at leslierahye.| YouTube at leslierahye | Pinterest at leslierahye

Thursday, October 16, 2014

31 Days of Halloween | Day 16 and a bit of a personal story

During the month of October I am participating in a month-long blog hop with some amazing artists. Everyday you will find a new Halloween project on all of the blogs listed below. Each project must have stamping on it, be it digi or ink. There are prizes to win, be sure to check out all the rules HERE and information on the daily scavenger hunt is posted there! You must go HERE to find the item/s you are looking for the scavenger hunt.

If you are looking for my Delightful Challenge Post it is here.


Welcome to Day 16 of the 31 Days of Halloween hop with SmearedInk.com! Happy Thursday everyone--warning this post is an overshare and might not be suitable for everyone...that's okay, I understand. Just look at the tile and read no further. I promise, I will not share a valued technique today. This is a personal story and rather the madness behind the tile.
Today I was "scheduled" to do a tag but I changed my mind. Let me tell you why and what's behind this strange tile. I am having a biopsy today for my thyroid...let's back up. Before my daughter turned 2 (she is now 8), I was diagnosed with Thyroid disease...I had Hypothyroidism--think thyroid in hyperdrive to produce--not making enough. As a condition of this you sometimes have a swollen thyroid, sometimes you get goiters [think lumpy balls] in your thyroid. When I was first diagnosed I was diligent in taking my medicine--not. The only daily pill I had been on ever was a birth control pill and it had been a good 9 years since I had taken one of those. I did not want to take a daily pill. I was not good at remembering. After a few years of attempting to remember my medication I just finally gave up and went into a 6 year period of denial where I did not take it and I did not go to the doctor--EVER.
After a difficult year medically with my son and my husband, I had promised my health would take center focus...if only I knew then.... So I started this journey with the new year--my word was THRIVE, right? I was going to THRIVE in every aspect of my life. A checkup led to more invasive doctors visits....a diagnosis of high blood pressure--score 2 pills--a diagnosis of diabetes--score a pill and a lifestyle adjustment--a diagnosis of hypothyroidism--score that stupid little pill I didn't want to take to start with and more invasive tests.
This summer I went through a horrifying sonogram with a crazy technician that had me convinced I had thyroid cancer. She was inappropriate and we hope wrong...we will know shortly. I got sent to a specialist last month to discuss "the next step." That is what we're calling the biopsy..."the next step." Basically this is to prove without a doubt that there is no cancer but rather some benign gunk in my thyroid in little goiters that can stay in me as long as they do not become a problem with my swallowing, breathing, etc. While I have tried the denial of stress thing for the last few months, those close to me know that this is killing me inside. This is evidenced by the explosion of fever blisters across my lips today [written Wednesday].
So Wednesday night before my biopsy, as I looked at my cut tag and thought of what I wanted to add, I kept thinking how frightened I was of not knowing, how the doctor would be poking me with various skinny long needles and making slides of the goo that she pulled out...I really felt like I would look like Dr. Frankenstein's Monster as I laid there while the doctor held her sono-wand in one hand going from lump to lump and sticking needles in my neck. So as I worried and relieved some stress, I misted and stenciled and stamped and embossed and ended up with my Frankenstein's Monster Tile. There you go...the method to today's madness.  I hope you enjoy my project! Please come back tomorrow for more!


 photo WickedBloggerbutton_zpsbcaacb28.jpg
Smeared Ink Wicked Bloggers 2014
Julia | Lisa | Teresa | Keren | Renee | Alison
Steph | Sandy | Sarah | Stefanie | Barbara

Twitter at @leslierahye | Facebook at leslierahye.| YouTube at leslierahye | Pinterest at leslierahye

Thursday, October 2, 2014

31 Days of Halloween | Day 2

During the month of October I am participating in a month-long blog hop with some amazing artists. Everyday you will find a new Halloween project on all of the blogs listed below. Each project must have stamping on it, be it digi or ink. There are prizes to win, be sure to check out all the rules HERE and information on the daily scavenger hunt is posted there! You must go HERE to find the item/s you are looking for the scavenger hunt.

If you are looking for my Delightful Challenges Post please look here.


Welcome to Day 2 of the 31 Days of Halloween hop with SmearedInk.com! Today my Tag Thursday project starts on a base of Authentique Paper and has a layer of Embossing paste smooshed through a Tim Holtz stencil. I then spritzed with a mist of Dylusians ink and swirled on some brushed corduroy. Next I stamped a Halloween ad background stamp on some white cardstock with the same brown ink and added a witchy crow in Memento black highlighted with some orange marker. An orange bow and citrus green sequins and a bit of die cut border in black finish off this short tag!  I hope you enjoy my tag! Please join me again tomorrow!


 photo WickedBloggerbutton_zpsbcaacb28.jpg
Smeared Ink Wicked Bloggers 2014
Julia | Lisa | Teresa | Keren | Renee | Alison
Steph | Sandy | Sarah | Stefanie | Barbara


Twitter at @leslierahye | Facebook at leslierahye.| YouTube at leslierahye | Pinterest at leslierahye

Thursday, February 13, 2014

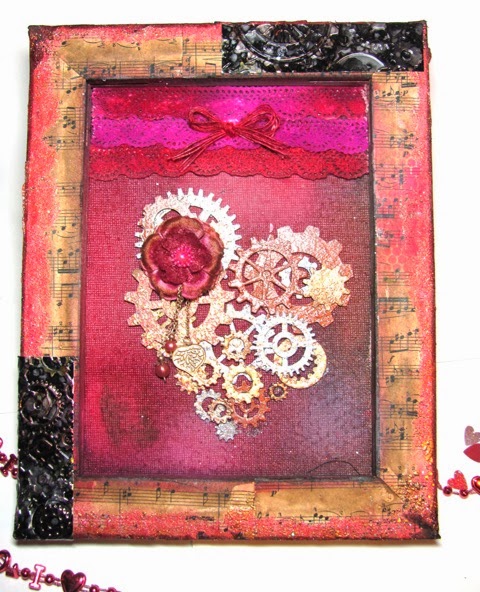
leslierahye's very steampunk Valentine Blog Hop | a love canvas


Welcome to the final post of my very steampunk Valentine Blog Hop! I've created a "backwards" canvas! I've been seeing these on the mixed media blogs and wanted to try my hand at it....I used yummy Globecraft & Piccolo chipboard and emboss enamels along with Dylusions mists and vintage music paper and embossed metals. I LOVE how my Valentine canvas turned out!


I hope you take the time to hop through each stop and enjoy my talented friends! Thank you for joining us in our Valentine Celebration!


Twitter at @leslierahye | Facebook at leslierahye.| YouTube at leslierahye | Pinterest at leslierahye