Friday, September 21, 2007

Solo R & Solo S Pages


Products Used:
Free Spirit Paper Pack
glossy cardstock*
waxy flax*
Honey ink and cardstock
Indian Corn Blue ink and cardstock
Cocoa ink and cardstock
Colonial White cardstock
brads
silk flowers*
name-badge pocket*
*items not CTMH


Techniques Covered:
Serendipity Squares
Soot Stamping
Wipie Ink Pad


Solo R Page:


detail of "r"

Solo S page:

details of "s"


directions to follow...

Serendipity:/ser•en•dip•i•ty/


noun: the faculty or phenomenon of finding valuable or agreeable things not sought for
adjective: obtained or characterized by serendipity

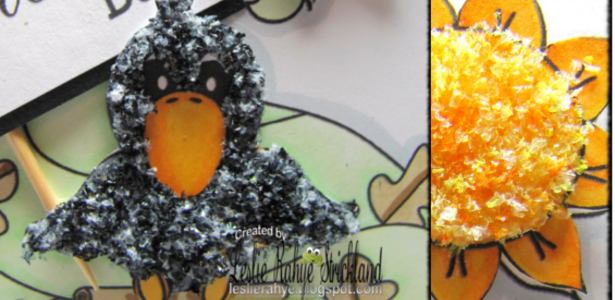
Serendipity squares and shapes are popping up all over scrapbooking and cardmaking these days. The are nifty ways to use up pieces of paper that you have left over from projects, but you can also buy papers specifically with serendipity shapes in mind. There is no wrong way to do this, just a few basic steps to get you started. They add texture and interest to any piece of paper and are fun to create.


Supplies:
Necessary—
Cardstock (to build your serendipity on)
Coordinating paper (scraps, variety of textures, cardstock, vellum, mulberry)
Glue (glue stick or xyron works best)

Not necessary but fun—
Decorative scissors
Punchies
Clear embossing powder (EP)
Stamps, colored EP, versamark/embossing ink
Heat tool
Stickers
Fiber, beads, charms, wire
see a more complete list below.

The steps:
1. Select your piece of cardstock to build your serendipity on. Whatever color theme you prefer, think of this as the background piece.

2. Choose coordinating papers in your theme—I sort my scraps by "color" just for this purpose. I keep bits and pieces as they will always make fun squares/shapes. This paper can be handmade, mulberry, embossed, metallic, vellum, patterned, anything!

A friend—who taught me to serendipity—suggested that those papers that you bought when you first started scrapping (you know the ones…bordered papers, obnoxious patterns, that "slab" you've all groaned about…) are perfect for this. …because…

3. Now tear and cut and punchie these papers. Use those decorative scissors, punchies, tearing and cut with a cutter. Whatever to make your papers into smaller pieces to glue onto the cardstock.
You can also add texture to them by distressing them, wadding them up, or running them through the crimper.

4. Glue them down—the pieces that is! Don't worry about design at this point, glue down the pieces of paper and make sure that all of the piece is covered so that it won't try to come off when you're cutting. You can let some of the paper overlap the edges as this can be trimmed off later. It will look cluttered—it's supposed to.

GLUE TIP: use an old magazine or catalog for gluing. You can run your glue stick over the edges and then turn the page to glue the next piece—no worries about the glue sticking to the next piece. When you're done with the magazine/catalog—throw it away! (from Sara)

Now you can stop here and cut them up into shapes or squares (see #6).
Here's some where that's all I did:
http://gallery.lifetimemoments.com/showgallery.php?cat=500&page=6&ppuser=638

OR…
5.
You can EMBELLISH!!!
If you are going to stamp and emboss, it is first suggested to sprinkle clear EP allover the surface of the collage, shake off the excess and emboss it with the heat gun. This keeps other colors of embossing powder from sticking to the stray glue goobers that might have been left from the gluing process. (Sara tip).

You can add ANYTHING to it:
stickers
skeleton leaves
stamps
glitter
punchies
confettie/sequins
ribbon/fibers
Magic mesh
chalk/metallic rub-ons
paint/ink dabs/splates/sponges
Pearl Ex/Perfect Pearls
Glitter/Gel pens/markers

6. Cut the collage into shapes when the adhesive is completely dried—keeps the papers from moving. For squares, I fine a cork-backed ruler, cutting mat and craft knife work best. You could also use a rotary cutter. For shapes, try die cut machines (sizzix, Ellison and Acucut all work well), big punches, and templates. Your imagination is your only limit.
Once cut, you may see places that need a little extra something. It is perfectly okay to "add" more onto it.

7. EMBELLISH AGAIN!!
Your saying to yourself—AGAIN?? Well you can wrap fibers, wire, raffia, ribbon—whatever around it. Apply beads, charms, punchies with popdots, glitter, confetti, whatever to the finished shape. You can mat them with a contrasting/coordinating cardstock. You can use the negative shape of a punchie for an added embellishment on a tag, card or page.

These can become as simple or as ornate as you like!

Here are some suggestions of places to use your serendipity items :
- Using jumbo punches to punch out shapes (hearts, stars, ovals, flowers
- Using a letter template to cut title letters
- Cutting long strips for borders or weaving
- Cutting the collage into large rectangles for photo mats
- Cut circles, squares or ovals and connect them to make a chain
- Cut tags from the collage (or embellish tags with squares, shapes)
- Use the Sizzix machine (or other die cut machine) to cut letters or shapes from the collage page
- Use squares behind your title letters, gluing letters on top.
- Use as squares to mat letter stickers for titles.
- Journaling box – print out journaling on vellum. Place serendipities behind vellum on page.
- Use collage shapes as borders – either down each side vertically or across the top/ bottom of the page.
- Cut circles from your collage sheet and glue them into metal-rimmed circle tags.
- Mount squares on coordinating cardstock and put a brad in the center of each square. Use as accent pieces on the page.
- Tie shapes/squares together with fibers, jute, raffia, cording or ribbon.

Shabby-Chic


"Shabby-Chic" Style is a wildly popular decorating trend. Rachel Ashwell, the owner of Shabby Chic and the 1996 author of "Shabby-Chic decorating" is credited for making the comfortable, eclectic and affordable -- trendy and beautiful.

Rachel taught us to appreciate the glory of simplicity and imperfection. Aficionados of the style give 'found' items new life and function, celebrating their less-than-perfect appearance. They distress items, combine them, and make something cozy and stylish of ordinary old items that they love.

Shabby Chic style is characterized by such colors as pastel pinks, muted greens, and washed gray or neutral tones combined with dark contrasting colors. Think vintage, well-worn, peeling, and well-loved. Think comfort. Shabby chic is not intimidating – it is warm, cozy and inviting.

Shabby chic is an easy style to achieve because it can include anything you love, mixing colors, patterns and textures. They key is finding a grouping of things you love and making them work together.

So what does this have to do with scrapbooking?
The Shabby Chic trend has moved into scrapbooking techniques. It involves distressing papers and page elements to give a vintage, well-worn look to them. It works especially well with heritage photos, black-and-white photos and sepia photos. It is an inexpensive (imagine that in scrapbooking!!??) way to add interest and variety to your pages.

Here are several techniques for giving your pages a tattered, antique, natural look. These techniques work best on papers/cardstocks that have a white or light-colored core. The distressing allows the core to show through.

Technique 1: Distressing Paper
Crumpling, Creasing, Wadding:
Feeling frustrated? Try a little Shabby Chic therapy! Take out your frustrations on some paper. There are two main techniques for this technique: wet and dry.
Dry: Wad paper into a loose ball. Gently unfold paper. Wad again, unfold and repeat until paper is sufficiently soft and crumpled. . A brayer or warm iron can be used to flatten paper.
Wet: Sprinkle or mist paper/cardstock with warm water. Crumple, and GENTLY unfold, being careful not to tear paper as you unfold it. You can either let it air dry or flatten it with an iron. To iron, put several sheets of paper towel underneath and on top of paper. Iron until dry or slightly damp. Either way, let paper dry completely before using.
Note: crumpling paper 'shrinks' the paper a little. I like to do a whole sheet at a time, cutting it to size after it is crumpled.
Crimping: Another way to age and add texture to your cardstock is to run it through a crimper, over and over in different directions. This softens and creases paper for a worn look.

Now that you have aged your paper by crumpling it, you can further "age" it by applying some of the following techniques:

Technique 2: Sanding and Steel Wool
This part is messy. Lay a piece of scrap paper or an old catalog on your work surface.
Using a fine or medium grade sandpaper, gently rub the sandpaper over cardstock, scratching and marring the surface. Sanding paper or cardstock that has a light or white core will create a visually-interesting effect.
Gently rough-up the edges of the paper with the sandpaper, rolling to expose the white core.
To create the look of an old document, fold paper and sand over fold lines.
Try sanding over lettering (computer or hand-drawn)
Create an aged look on black and white photos by gently sanding them in one direction. This works especially well for computer-generated prints.
Give new life to shiny paper stickers or pre-made embellishments by sanding the surface.
Try this with patterned paper – especially plaids and subtle country-style patterns.
*picture* plain and sanded paper

Technique 3: Add color backNow that your paper has been distressed, you can add color back to the lines with one of these methods:
Chalking: This can be achieved with Craf-T chalks. Just rub Q-tip into chalk and then rub on paper.
Inking: Using a fingertip dauber, pick up ink and flick onto edges of paper. This works especially well to create a 'burned' look to the edges of paper. Just use a deep brown to ink the edges and flick very lightly outward while holding paper off of table.
Metallic Rub-ons: Use your fingertip to pick up a little color from the palette. Rub onto page in circular motion. Layer until desired effect is achieved.
Sponging: Using a natural, art, or make-up sponge, ink color onto paper. A dye-based ink or Colorbox Fluid Chalk Ink are ideal for this application. Try sponging with a wadded ball of Saran Wrap or Aluminum foil. How about a mesh bath-sponge?!
Direct to paper inking: Very gently press ink pad onto wrinkled or folded paper, leaving fabric lines.
Brush Marker Faux-burning:
Who doesn't remember making a map replica in school by burning the edges? An easy way to achieve this look is to tear the edges of your paper and rub the edge with a dark brown marker.

Technique 4: Staining
Another way to add color back to distressed paper is by staining it. Staining is not acid-free, so be sure to buffer these items when using in scrapbooking.
Four methods for staining are:
Walnut ink: Mix Walnut ink with distilled water (for archival solution) and paint on cardstock. Iron to dry and flatten.
Tea Dyeing: Boil water and add several tea bags. Cool to lukewarm.
Place paper in a cookie sheet that has a lip. Pour tea over paper. Let sit until slightly darker than you want end-product to be.
Spray or splatter paper with tea solution.
Coffee Staining: Bathe a wet piece of paper in a mixture of instant coffee and warm water. Put a few crystals directly on wet paper for variations in color.
Faux-staining: Apply a light wash of light brown stamping ink (dye-based) which has been mixed with water.

Technique 5: Tearing edges
Rip edges of paper for further vintage-look. For precision, run a water-soaked Q-tip down line where tear is desired. Keeping your hands close together, tear towards your body.
Torn edges can be aged with ink or chalk, if desired.

Technique 6: Wire brushing
Using a wire paint-removing brush, gently brush paper in one direction. For a plaid look, brush in other direction. Be careful to lift top layer, but not to tear holes. Magic Scraps metal brushes are perfect for this technique.

Technique 7: Handmade Papers
Handmade papers are wonderfully textured and inexpensive. Use your scraps to create sheets of colored paper to give a primitive or country look to your page elements.
Don't forget that you can add "inclusions" - items such as dried flowers, dried pressed leaves, seeds, confetti, feathers when you are making paper.

Technique 8: Alter photos to Black and White or SepiaBlack-and-White and Sepia pictures already look Shabby Chic. This is especially helpful for photos that have difficult color schemes. There are several ways to achieve this look:

Take photos using true black-and-white film. This type of film must be sent to a lab for processing.

Take photos using C-41 film which is black-and-white, but can be processed in color chemicals. Sometimes this turns out with a sepia tone.

Turn color photos into black-and-white or sepia by scanning them and printing them on your computer or using the Kodak Picture Maker.

Other Shabby Chic Tips:

  • Use several different papers together on your page. Mix textures and patterns.
  • Use fringe or lace to add a touch of Romantic Shabby Chic to a vintage layout.
  • Hit your local flea markets and yard sales. Old jewelry randomly draped on the page adds an element of authenticity and interest.
  • Try: burlap, torn corrugated cardboard, kraft-colored lunch bags, jute, twine or rusty shapes.
  • Try stitching two torn pieces loosely together or tear a V into page, letting a patterned paper show through the hole.
  • For journaling and titles, try using antique-style letter stamps or antique fonts (typewriter fonts)